With the inevitable increase of internet connected devices, mainly due to the surge in Internet of Things (IoT) products, the number of vulnerable (or potentially vulnerable) devices is ever increasing. Today we have everything from internet connected thermostats and door bells to toy dolls and cars.
Contents
Security zones with home NAT/Firewall routers
NOTE: All references to router(s) in this article refer to a home / consumer grade NAT/Firewall router designed to be placed on a home internet feed, therefore it will have a stateful packet inspection firewall, it does not just route traffic.
If you’re worried about the security implications of next generation devices within your network, then implementing security zones within your small (most likely home) network could be a route forward. I first stumbled across this technique 3 years ago when it had been implemented within a small business in an attempt to create additional access points to improve WiFi coverage. They were running into connectivity issues between systems, inadvertently caused by the zones they had accidentally created. However, if implemented carefully, and tested to ensure it is functioning as expected, it may prove a useful tool.
In this example, there are three home / consumer routers that have been connected together to provide differing security levels. As a photo does not clearly describe the number networks created and their relationships, this is drawn out in logical form.
You should remember that this post makes some assumptions around the default behaviour of your routers, and you should complete some tests to ensure the separation is as expected.
This same setup could also be created with less or more routers, to suit your requirements (most likely two routers). Also remember that different routers have different feature sets and therefore may provide more or less networks per router than covered here. It is worth noting that whilst this is a low cost and practical solution for the home network with security aware users or specific segmentation requirements, it is not a large enterprise solution.
This logical view shows the networks created by the 3 router configuration, this allows you to see the inter-network connectivity in a two router configuration, eg: RED and GREEN, but also in larger 3+ router designs.
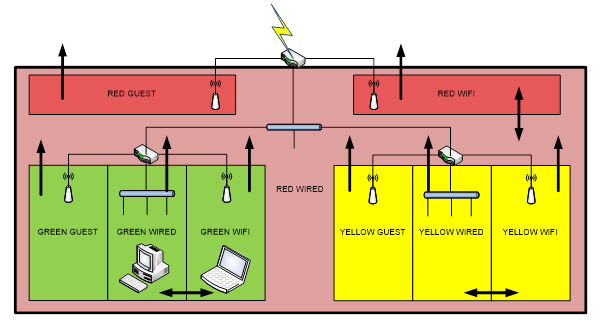
The RED network is formed by the LAN behind the initial router connected to the internet feed. This is the lowest security zone in the design other than the internet zone itself, and its resources are subject to access from higher security zones.
The GREEN and YELLOW networks sit at the same security level as each other, therefore access between them is blocked as they are created by separate routers (at the same level). They are both able to access the RED network, and the Internet zone.
Within each coloured area, there are several networks created, these are:
- WIRED – The Ethernet sockets on the router, or any cabled devices connected to them.
- WIFI – The internal wireless network offered by the router.
- GUEST – The optional guest wireless network feature available on some routers.
- Others? Yes, there could be more, consider a router with additional wireless networks available to configure, or a DMZ network socket for example. You would need to review how these work on the model of router you have, and maybe draw your own basic logical diagram.
Same router – network security zones
Access between WIRED and WIFI networks on the same router is normally allowed and unrestricted. Some routers provide ‘Wireless isolation’ which is designed to block inter-device access on the same wireless network. In some cases this blocks access to wired devices and all other wireless devices, in others access to wired devices is ALLOWED however access to other wireless devices is blocked. If you wish to utilise wireless isolation on a wireless network, check the manufactures manual and perform some tests to ensure you’re familiar with the implementation.
Access between the GUEST wireless network and the WIRED and WIFI networks should be blocked by the router, however remember that in the case of the GREEN and YELLOW GUEST networks, they are likely to be able to access the RED WIRED and WIFI networks.
More detail on zones
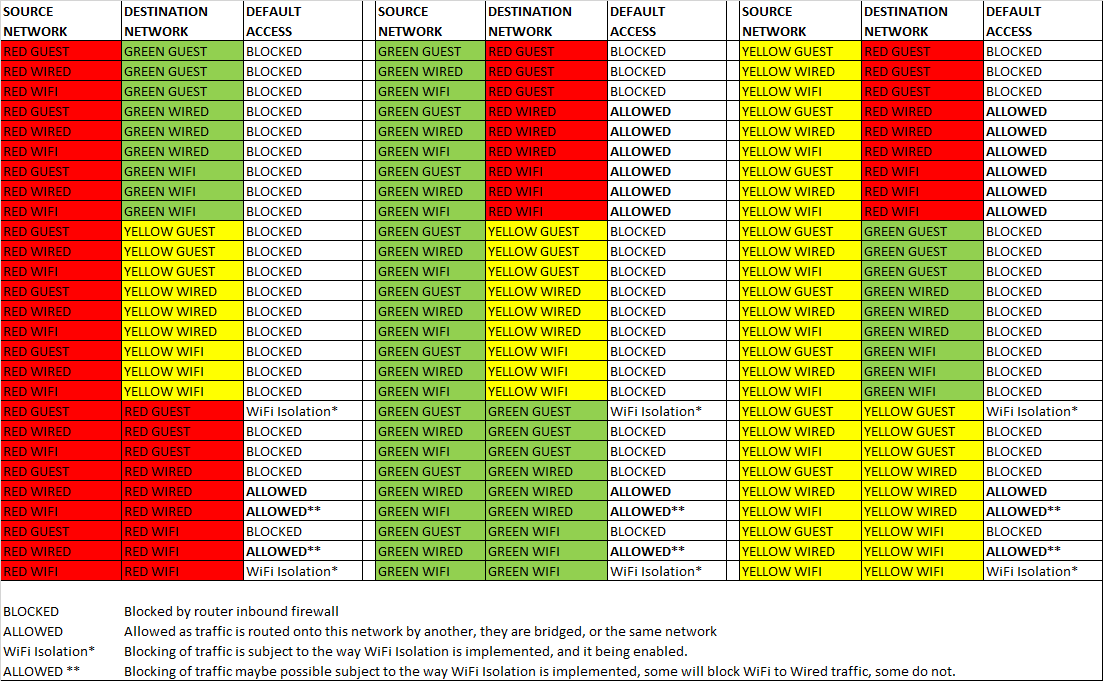
Detail on zone boundaries – Click to enlarge
Deploying devices into a 2 router design
When deploying devices into this design, you will need to consider what they need access to, what needs access to them and also what access you want to ensure is blocked. This will help you select an appropriate network zone, so let’s consider some example devices and zones:
- Trusted Laptops GREEN WIFI
- Printer RED WIRED
- Wired PVR / Hard disk Recorder RED WIRED
- Wireless TV GREEN WIFI
- Tablets GREEN WIFI
- Phones GREEN WIFI
- Visitor/Guests RED GUEST
- Thermostat GREEN GUEST
- Door Bell GREEN GUEST
As we want no access to our trusted laptops from guests or untrusted devices, we will connect the trusted laptops to the GREEN WIFI network. It’s likely phones and tablets may fall into the same zone, so they will here. But if you want to block their access to internal network resources, eg a NAS, then consider connecting them to a different zone, eg: GREEN GUEST.
We want to connect our IoT devices, they require no access to our computers, just to the internet. Therefore we will connect these to the GREEN GUEST network, with isolation enabled.
In order to cater for our visitors/guests, we would like them to connect to a network that is also isolated, but if we provide them with the same passphrase as our IoT devices (GREEN GUEST), it will become harder to change. Therefore we will give them access to the RED GUEST wireless network. This will separate the untrusted devices across two guest networks, the ‘owned’ IoT devices onto the GREEN GUEST and visitors on to the RED GUEST, neither should be able to access the other. We can now enable wireless isolation to protect every guest from every other guest, and every IoT device from every other IoT device.
Should we want devices that we can make connections to, but those devices can’t connect to internal GREEN WIFI devices then these can be connected to the RED WIRED or WIFI network. Access will be allowed outbound through the green router for GREEN WIRED and WIFI devices, into the RED network but access from a RED device to a GREEN would be blocked by default. Placing the PVR and Printer into the RED WIFI or WIRED zones allows green devices to connect to view recordings or print files, but does not allow a compromised printer of PVR firmware access to the internal GREEN network by default.
Adding a 3rd router (YELLOW) into the design would create additional networks if required.
Closing thoughts
You should note that this is only as secure as the router firmware and its configuration. In most situations, you will be able to add rules that bypass the security covered here.
In summary, chaining or stacking home/consumer routers can provide an interesting array of networks with differing security characteristics, which can be used to build interesting home networks. It is also a great way to learn about how some of these security features work and interact.
In a future post I will be exploring this network segmentation / zoning using a different approach. Stay tuned.
What is the difference for you between:
Wired PVR / Hard disk Recorder RED WIRED
Wireless TV GREEN WIFI
Why this seperation?
Thanks!
Great question!
Wired PVR / Hard disk Recorder RED WIRED
This would enable devices on the GREEN network to access stored recordings on the RED network connected PVR.
Wireless TV GREEN WIFI
To stream to some TVs from a mobile device etc, the TV needs to be accessible to the device, hence GREEN. If the TV is connecting to storage on GREEN such as a NAS to stream, it would still need to be GREEN connected.
If the TV was streaming from the internet, then it should be RED connected.
Hope that helps.
Thanks for the detailed explenation.
Any new thoughts in late 2018, or is it valid as of today?
This is still valid as of today. 🙂
Nice write up, thanks.
I heard something similar by Steve Gibson on the SecurityNow podcast so it’s nice to see a written detailed design of the approach.