![]()
Contents
- 1 Introducing Office Web Apps
- 2 Install prerequisite software
- 3 Generating & installing the SSL Certificate
- 4 Installing Office Web Apps 2013
- 5 Updating Office Web Apps Server 2013
- 6 Deploy the farm
- 7 Configuring the load balancer
- 8 Setup load balanced DNS name
- 9 Testing the farm
- 10 More Security Settings
- 11 References & Further Reading
- 12 Next time…
Introducing Office Web Apps
Microsoft Office Web Apps 2013 allows you to “access and share Office documents with browser-based versions of Word, PowerPoint, Excel, and OneNote” (Ref: microsoft.com). It enhances the Lync collaboration experience for all parties when sharing documents during conferences. You can deploy an Office Web Apps Server or farm (group of servers) to integrate with SharePoint 2013, Exchange 2013 and Lync 2013.
Office Web Apps Server used be called Web Application Companion (WAC) and is still commonly referred to in this way. This could well just be the time it takes people to adjust, however ‘WAC’ is much quicker to say than ‘Office Web Apps’ and using OWA would cause confusion in some environments hence servers in this post are named WAC.
Below we will be deploying a enterprise farm for initial use by Lync 2013, the farm could later support Exchange 2013 or SharePoint 2013 should they be installed, farm options may need setting at this time via PowerShell.
Install prerequisite software
There are a number of packages required on the system before the installer is run, these are listed in the below PowerShell command and support the web stack on the server. When logged into the Windows Server 2012 R2 server, ensure the media is still mounted and open a PowerShell prompt (run as administrator), then use the elow PowerShell and repeat on all future WAC farm servers. (You can also install Office Web Apps on a Windows 2008 R2 server, the prerequisite information for 2008 R2 is available on TechNet.)

Add-WindowsFeature Web-Server,Web-Mgmt-Tools,Web-Mgmt-Console,Web-WebServer,Web-Common-Http,Web-Default-Doc,Web-Static-Content,Web-Performance,Web-Stat-Compression,Web-Dyn-Compression,Web-Security,Web-Filtering,Web-Windows-Auth,Web-App-Dev,Web-Net-Ext45,Web-Asp-Net45,Web-ISAPI-Ext,Web-ISAPI-Filter,Web-Includes,InkandHandwritingServices,NET-Framework-Features,NET-Framework-Core -source d:\sources\sxs -Restart
You may need to define the install sources location, in my case it was “-source d:\sources\sxs” so this is included above. Once complete, the server will reboot automatically (thanks to the -Restart).
Generating & installing the SSL Certificate
In order to secure communications between the client and Office Web Apps, you will need to secure the communication with an SSL certificate.
In a single server deployment, the SSL certificate should be installed on that host.
In a farm topology the SSL certificate can be installed in one of two places.
- If you have a load balancer with a hardware SSL module, you could use SSL offloading. In this case the certificate must be imported on the hardware load balancer.
- Allow the servers to complete all of the SSL work, and pass the traffic through from the load balancer. Here the certificate will be installed on each server in the Office Web Apps Server farm.
Within this lab, a farm will be deployed with load balancing and no SSL offload.
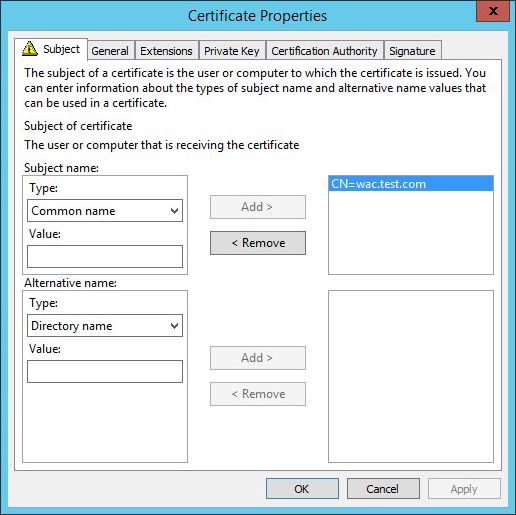
First of all you will need to generate a certificate request, you need to ensure you define a friendly name so this can be quoted when you install the Office Web Apps farm. I will not cover the full process here, but have included some key information. I setup the lab PKI to allow me to enroll the certificate via Active Directory and then restricted this with the security configuration.
Key Certificate Options
- Use = Server Authentication
- Common Name = wac.test.com
- Friendly Name = WAC Farm 2014
- Key Size = 2048 (Recommended minimum at time of writing)

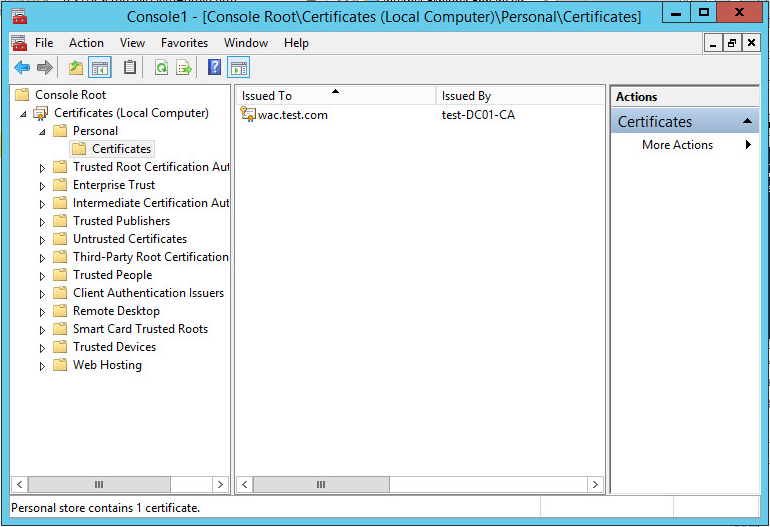
You must install your newly obtained wac.test.com certificate (including the private key) into the Local Computer, Personal Certificates store on both servers.
You can open the certificate store via: Run > ‘mmc’ > File > Add/Remove Snap-in… > Certificates > Add > Computer Account
Installing Office Web Apps 2013
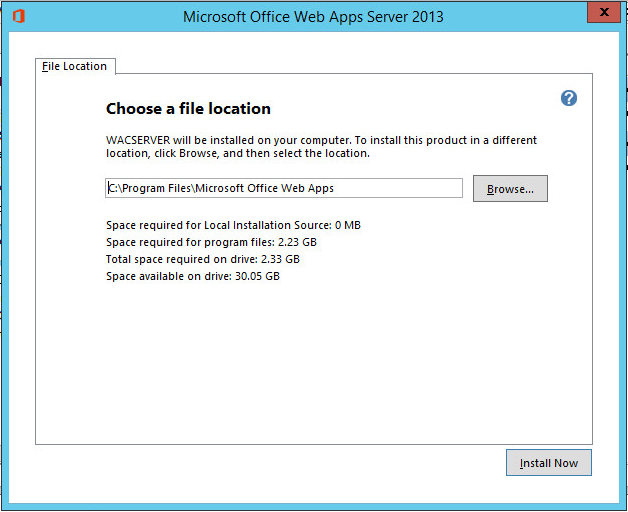
Once you have downloaded the Office Web Apps 2013 installer, and the Office Web Apps 2013 Update as per my last post, you need to either mount the installer .img file to the virtual CD drive as you would an .iso, or Windows Server 2012 can open the .img file directly. Run the Setup.exe in the root of the disk.
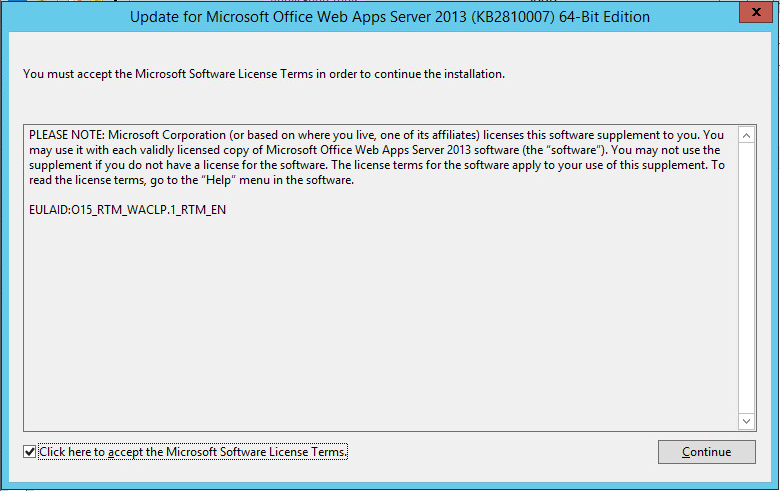
You will need to accept the terms of this agreement, choose an install file location and select Install Now.
When setup finishes installing Office Web Apps Server, choose Close. The servers firewall must be configured to allow access to the WAC service hosted on TCP/443. This server is now ready to be updated and configured.
Updating Office Web Apps Server 2013
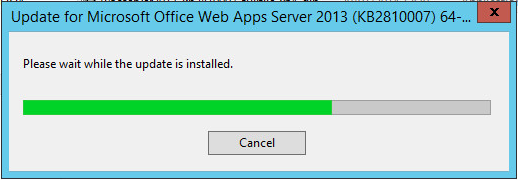
Copy the update file to both servers in the Office Web Apps farm, and then install the update. At this stage, the farm is not deployed and is not in service, so take the chance to install all of the latest updates and reboot both servers.
Deploy the farm
There are several options when deploying the farm:
- Deploy a single-server Office Web Apps Server farm that uses HTTP
- Deploy a single-server Office Web Apps Server farm that uses HTTPS
- Deploy a multi-server, load-balanced Office Web Apps Server farm that uses HTTPS
As discussed already, I will be using option three (full details of all options here). This provides us with protection from a server failure, and protects our users and data with SSL as all pages will be hosted securely. As we do not have a hardware SSL module in our load balancer, we will configure the servers to terminate the SSL.
On the first server, create the WAC farm:
New-OfficeWebAppsFarm -InternalUrl "https://wac.test.com" -ExternalUrl "https://wac.test.com" -CertificateName "WAC Farm 2013"
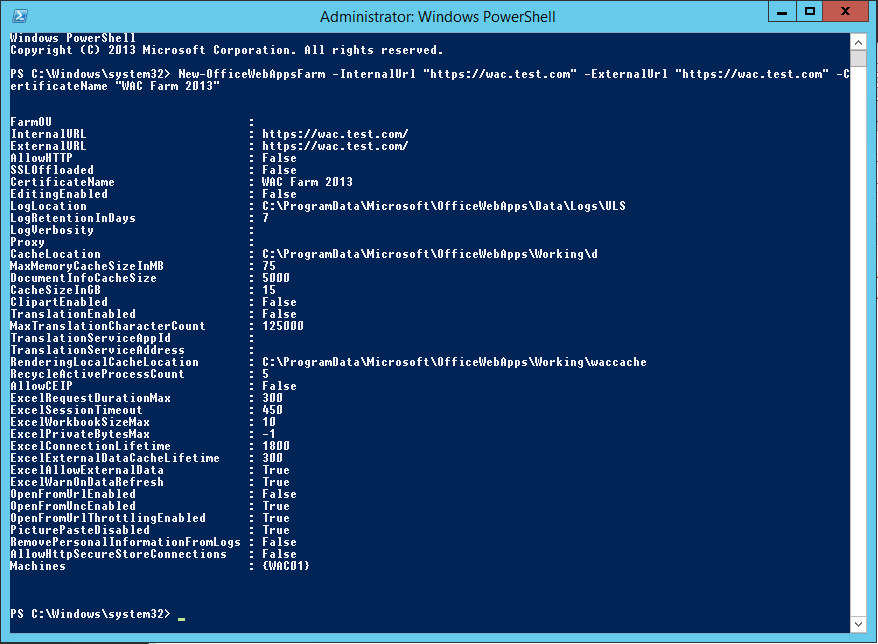
This shows the example results:
PS C:\Windows\system> New-OfficeWebAppsFarm -InternalUrl "https://wac.test.com" -ExternalUrl "https://wac.test.com" -CertificateName "WAC Farm 2013"

FarmOU                            :
InternalURL                       : https://wac.test.com/
ExternalURL                       : https://wac.test.com/
AllowHTTP                         : False
SSLOffloaded                      : False
CertificateName                   : WAC Farm 2013
EditingEnabled                    : False
LogLocation                       : C:\ProgramData\Microsoft\OfficeWebApps\Data\Logs\ULS
LogRetentionInDays                : 7
LogVerbosity                      :
Proxy                             :
CacheLocation                     : C:\ProgramData\Microsoft\OfficeWebApps\Working\d
MaxMemoryCacheSizeInMB            : 75
DocumentInfoCacheSize             : 5000
CacheSizeInGB                     : 15
ClipartEnabled                    : False
TranslationEnabled                : False
MaxTranslationCharacterCount      : 125000
TranslationServiceAppId           :
TranslationServiceAddress         :
RenderingLocalCacheLocation       : C:\ProgramData\Microsoft\OfficeWebApps\Working\waccache
RecycleActiveProcessCount         : 5
AllowCEIP                         : False
ExcelRequestDurationMax           : 300
ExcelSessionTimeout               : 450
ExcelWorkbookSizeMax              : 10
ExcelPrivateBytesMax              : -1
ExcelConnectionLifetime           : 1800
ExcelExternalDataCacheLifetime    : 300
ExcelAllowExternalData            : True
ExcelWarnOnDataRefresh            : True
OpenFromUrlEnabled                : False
OpenFromUncEnabled                : True
OpenFromUrlThrottlingEnabled      : True
PicturePasteDisabled              : True
RemovePersonalInformationFromLogs : False
AllowHttpSecureStoreConnections   : False
Machines                          : {WAC01}
PS C:\Windows\system32>
If you using SSL Offload, you will need to adjust this command accordingly:
New-OfficeWebAppsFarm -InternalUrl "https://wac.test.com" -ExternalUrl "https://wac.test.com" -SSLOffloaded
If your deploying Office Web Apps server to use with other products such as Exchange 2013 or SharePoint 2013, there maybe further considerations including use of the -EditingEnabled option, licensing and farm size to consider here.
On the second (and any further) server(s), join the existing farm via its master server.
New-OfficeWebAppsMachine –MachineToJoin "wac01.test.com"
![]()
You can check the farm configuration by using:
Get-OfficeWebAppsFarm
Configuring the load balancer
To complete the farm, we need to balance requests across the member servers. This can be achieved using the load balancer we deployed earlier in the lab.
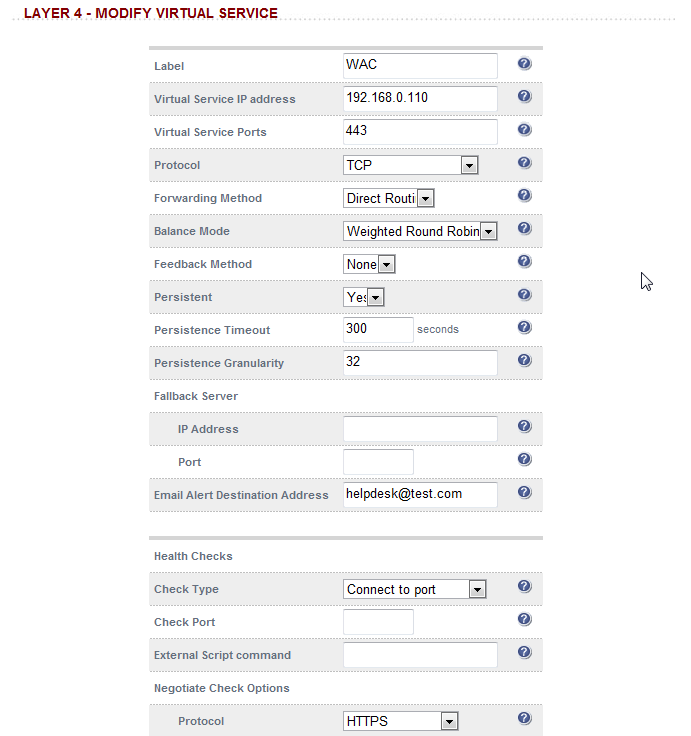
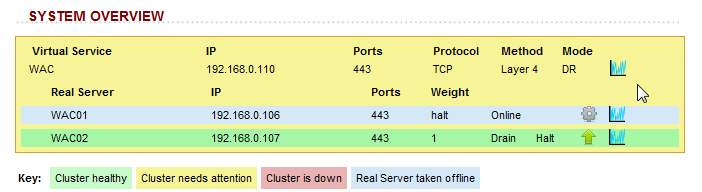
First define the ‘virtual’ service and its ‘virtual’ IP (VIP). Following the installation of the loadbalancer.org server within the lab, we can reconfigure the initial virtual service.
Set the following parameters:
Name = WAC
Virtual Service IP address = 192.168.0.110
Virtual Service Ports = 443
Persistent = Yes
Email Alert Destination Address = (as required)
Negotiate Check Options - Protocol = HTTPS

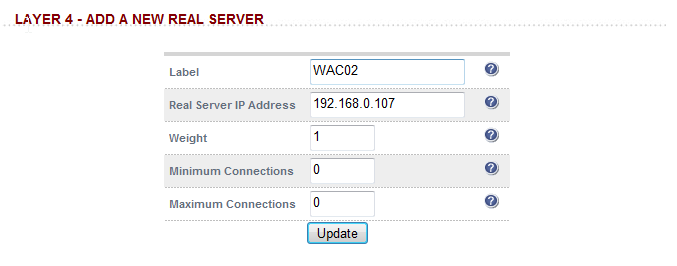
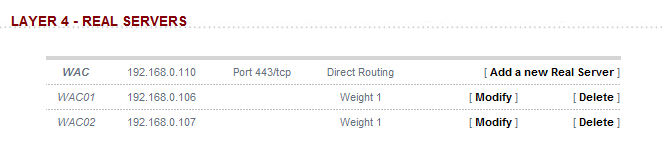
Now add all the ‘real’ servers into the virtual service. In this case, add WAC 02 into the configuration:
Label = WAC02
Real Server IP address = 192.168.0.107
Also revise the name of the first server from Real_Server_1 to WAC01.

Review the configuration and status of the new virtual service. If the service is down, double check the firewall configuration on the servers and complete some connectivity tests.
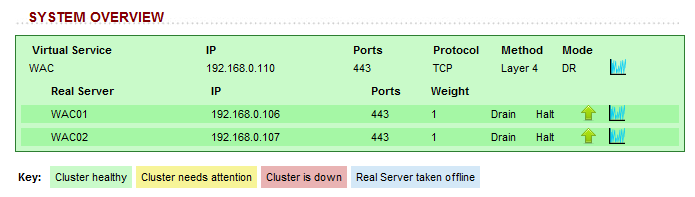
Please note that the ARP problem must be solved on each real server. Please see the DR Mode Considerations section in Chapter 6 of the Administration Manual for guidance.
** Details to follow **
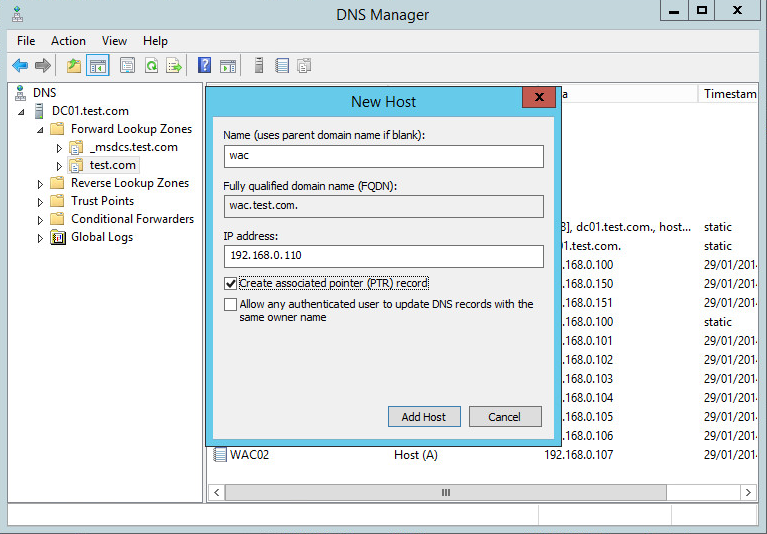
Setup load balanced DNS name
On your lab DC, or within your internal DNS service, you need to define the wac.test.com DNS A record.
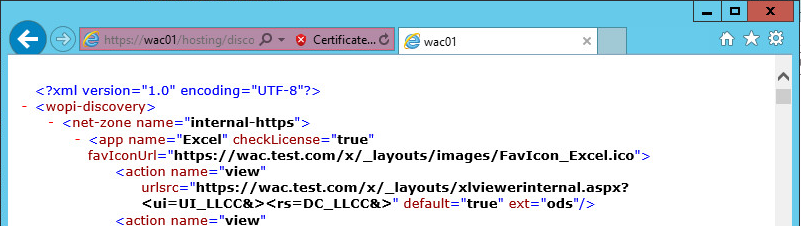
Testing the farm
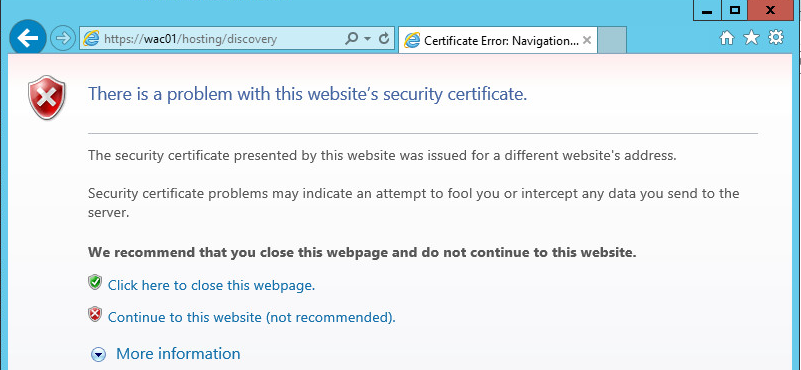
In order to ensure the farm is working as expected, you should test each server:
https://wac01.test.com/hosting/discovery
https://wac02.test.com/hosting/discovery
You will see an SSL error for each server, this is acceptable providing the certificate you receive from the server is for wac.test.com because users will not hit the server addresses directly in this way. If you do not get the correct ‘shared’ certificate, revisit the earlier steps in this post and double check your farm configuration.
Lastly we need to test the load balanced address to ensure the same result. You should test the following address several times changing the load balancer to ensure both nodes reply correctly.
https://wac.test.com/hosting/discovery
You can also check access on both servers via the IIS Logs (located in C:\inetpub\logs\LogFiles):
#Software: Microsoft Internet Information Services 8.5
#Version: 1.0
#Date: 2014-02-01 22:05:24
#Fields: date time s-ip cs-method cs-uri-stem cs-uri-query s-port cs-username c-ip cs(User-Agent) cs(Referer) sc-status sc-substatus sc-win32-status time-taken
2014-02-01 22:05:24 192.168.0.106 GET /hosting/discovery - 443 - 192.168.0.107 Mozilla/5.0+(Windows+NT+6.3;+WOW64;+Trident/7.0;+rv:11.0)+like+Gecko - 200 0 0 843
More Security Settings
Beyond end-to-end SSL/HTTPS there are a couple of more security options you may wish to consider, these are as follows:
Restricting which servers can join an Office Web Apps Server farm
You can prevent unauthorized servers from joining an Office Web Apps Server farm by creating an organizational unit (OU) for those servers and specifying the FarmOU parameter when you create the farm.
New-OfficeWebAppsFarm -InternalUrl "https://wac.test.com" -ExternalUrl "https://wac.test.com" -CertificateName "WAC Farm 2013" -FarmOU "OU=WAC Farm,OU=Member Servers,DC=test,DC=com"
Limiting client access to Office Web Apps Server via an Allow List
The Allow List security feature prevents unwanted clients connecting to an Office Web Apps Server farm. This allows control over file operation requests, such as file retrieval, metadata retrieval, and file changes.
References & Further Reading
TechNet: Deploy the infrastructure – Office Web Apps Server
TechNet: Windows PowerShell for Office Web Apps Server
How to license Office Web Apps Server
Next time…
In the next post, I will move on to deploying the back end Lync SQL Servers, which are required to support the Lync 2013 enterprise pool.