Build a Lync 2013 Lab: Part 1 – Build Lab Environment

Microsoft Lync 2013In this series of posts, we will cover building a Lync 2013 lab environment, that demonstrates how you can achieve high availability with the use of an enterprise pool and also achieve reasonable system capacity. This lab will be based on publicly available evaluation software, which you can download and use to prove the value of the software within your organization, or with perspective clients.

Small disclaimer: I aim to provide you with all the information you need to get this up and running, but would always recommend you obtain professional services for production deployments if your do not have the relevant experience/training.

Defining the Lab

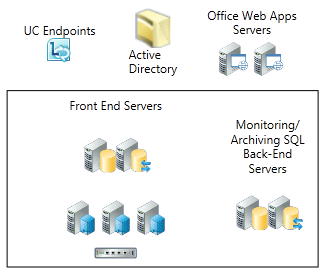
Our environment needs a number of servers and roles, we will cover each of these as we go through the lab build. In order to roll out our lab smoothly, we need to plan out our initial environment before we start. If your building a test lab, and want an enterprise pool with high availability then your fine to follow the below, however for other situations you should use the Lync 2013 Planning Tool.

Lync Lab Plan

Lab IP Addressing and Host Names

Test Network: 192.168.0.0/24 (192.168.0.1-192.168.0.254 usable addresses)
192.168.0.100	DC01
192.168.0.101	LYNCFE01
192.168.0.102	LYNCFE02
192.168.0.103	LYNCFE03
192.168.0.104	LYNCSQL01
192.168.0.105	LYNCSQL02
192.168.0.106	WAC01
192.168.0.107	WAC02
192.168.0.108	NLB01
192.168.0.109	NLB02
192.168.0.110	WAC VIP (wac.test.com) (Also the initial NLB Floating IP)
192.168.0.111	LYNC VIP (lync.test.com)
192.168.0.112	
--
192.168.0.150	DHCP Range Start
192.168.0.200	DHCP Range End
--
192.168.0.254	Default Gateway

Our Active Directory domain name will be: test.com
Our DNS server will be the Domain Controller DC01 (192.168.0.100)

Obtaining the required software

There are a number of applications required during the build of the lab, you may want to start downloading them now as depending on your connection, it may take some time. You should try and select products for your lab that match your production environment. These are all available as time limited evaluations, great for a lab environment and I have run the licensed/supported editions of all of these in production environments.

VMware vSphere 5.5 Evaluation
Microsoft Windows 2012 R2 Evaluation
Microsoft Windows 8.1 Evaluation
Microsoft SQL 2012 Evaluation
Microsoft Lync 2013 Server Evaluation
Loadbalancer.org Ent. VA v7.5.2 Evaluation
Microsoft Office Web Apps Server (WAC)
Update for Microsoft Office Web Apps Server 2013 (KB2837634)

Setting up the platform

In this lab I have a physical dual processor server with 32GB memory, running VMware vSphere ESX. This post will not cover the detail of installing or configuring this platform.

All servers in my lab are linked to a single virtual switch, that’s presented through the servers Ethernet adapter to a test switch. You can keep the whole lab virtual, or break out into a hybrid like this depending on your requirements. I want the option to add a wireless access point to this lab later down the line.

Lync Lab vSphere Client

Building the server environment

You will now need to complete the basic installation of Windows Server 2012 R2 on all the servers. You should install 2012 R2 Standard, with the GUI. Server Core is not currently supported by Lync Server.

Being a lab, I gave each server 1CPU, 4GB memory and a 40GB thin provisioned disk (60GB for SQL servers) at this stage. These can all be adjusted as we move forward with the build, but this will allow you to get the OS installed. In order to speed up and simplify later posts, we will build most of the servers we require now.

Install 2012 R2 on: DC01, LYNCFE01, LYNCFE02, LYNCFE03, LYNCSQL01, LYNCSQL02, WAC01, WAC02

I will not cover the process in the post for provisioning Active Directory, or making it highly available as this is a topic in its own right. However you should now promote your DC01 server to be a domain controller (which also includes DNS), then deploy PKI and DHCP.

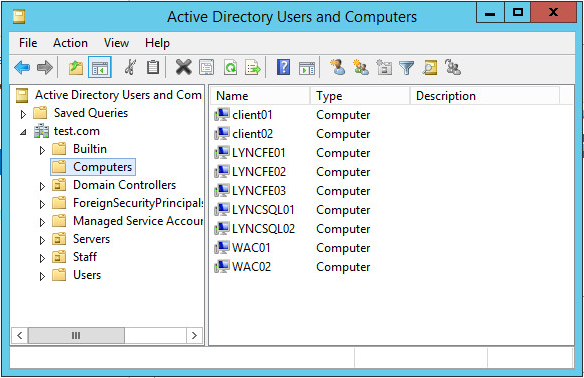
You will now need to join all your servers to the domain, and also deploy any guest tools you require. Eg: VMware Tools, AV etc.

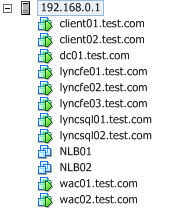
Lync Lab AD

Building the clients

In order to test the deployment, build two Windows 8.1 virtual clients. In my example, I will also be using my test PC as a 3rd client.

Building the Load Balancing

Documentation is available from loadbalancer.org to help with your deployment of the Virtual Appliance. In my test lab, I am deploying a high availability pair to match a real world requirement for maximum HA.

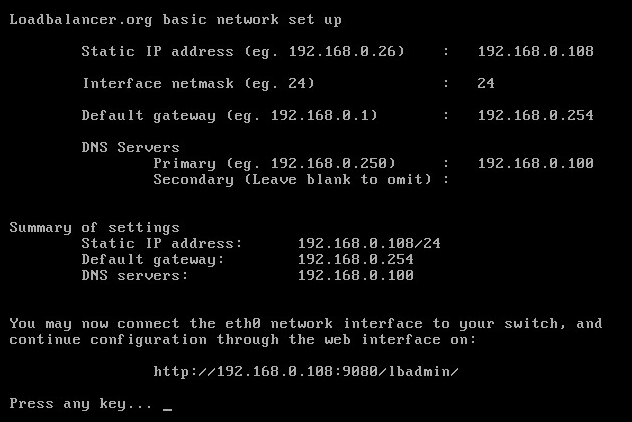
Once you have downloaded the Virtual Appliance in OVF format, deploy it twice into VMware under the names NLB01 & NLB02. You can then connect to the console and complete the initial network configuration by following the on screen instructions and using the IP addressing above.

loadbalancer.org Network Config

Once the appliances are on the network, connect to https://192.168.0.108:9443 and https://192.168.0.109:9443 using the below details.
Initial Username: loadbalancer
Initial Password: loadbalancer

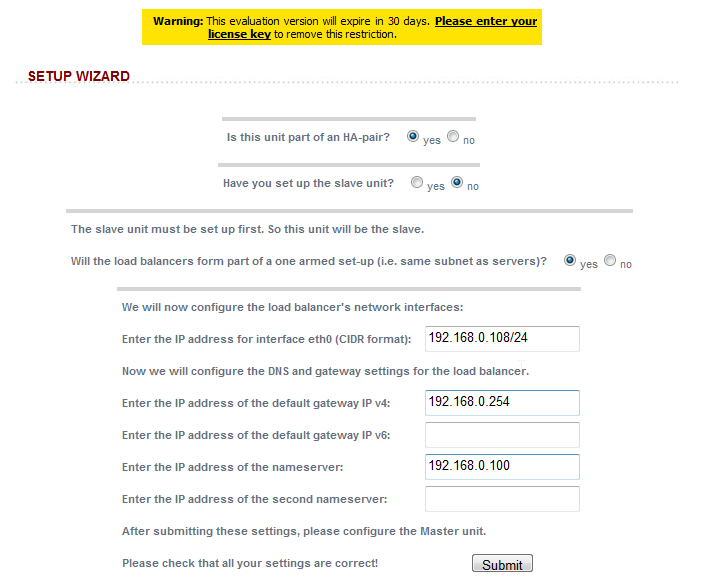
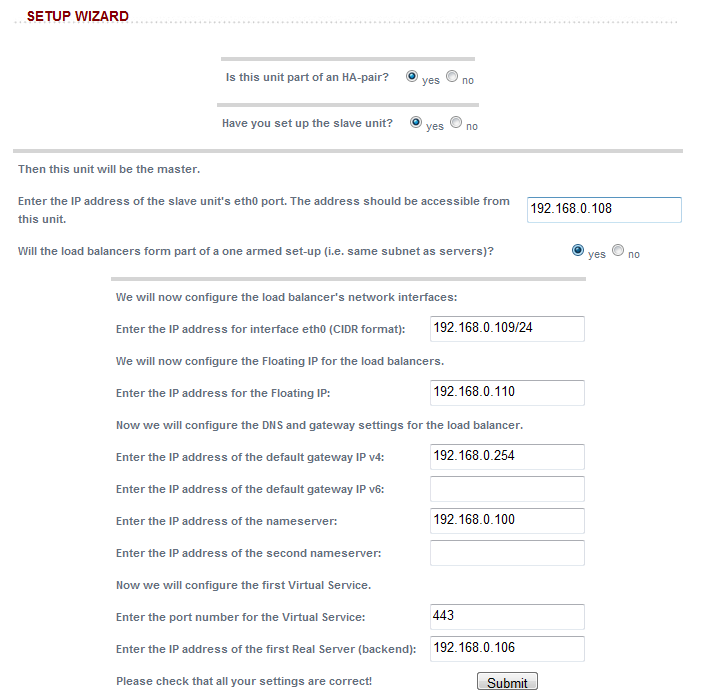
You will then need to run the wizard, first on the slave, then on the master. Here is the configuration in my lab:

Slave Unit:
loadbalancer.org Slave Unit Config

Master Unit:
loadbalancer.org Master Unit Config

Further info can be obtained from the loadbalancer.org manual available here.

You should now also change the loadbalancer password.

This completes the first post in the series as we are now ready to start deploying key elements of the application topology.

References & Further Reading

VMware vSphere manuals
Windows Server 2012 R2 Evaluation Resources
loadbalancer.org manual

Next time…

In the next post, I will move on to deploying services Lync requires, starting with an Office Web Apps Server farm, then SQL.
Facebooktwittergoogle_plusredditpinterestlinkedinmail

Updating Lync 2010 Standard Edition Server

Updating Lync 2010 is an important task, it ensures your deployment is secure and any identified issues are fixed. Best practice before starting any upgrade, for example to Lync 2013 in this case, is to ensure your current environment is operating correctly and is fully patched.

Methods for updating Lync 2010

There are several ways to complete this:

  • Method 1 Cumulative Server Update Installer
  • Method 2 Microsoft Update
  • Method 3 Manual installation

I have found the ‘Cumulative Server Update Installer’ to be the best method personally, as I know it has all of the Lync 2010 patches included and can be easily copied to the servers in the environment. There is no requirement for additional firewall rules, ensuring patches are released and downloaded from WSUS etc.

Updating Lync 2010 Standard Edition Server

Visit the ‘Updates for Lync Server 2010‘ page and download the LyncServerupdateInstaller.exe package. Notes for Enterprise Edition environments etc are also detailed here.

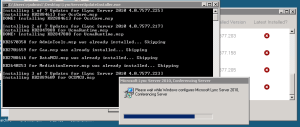
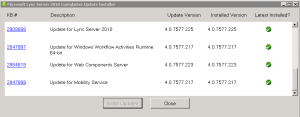
Run the package on the Lync 2010 Standard Edition server.

Lync Updater

Lync Updater Complete

Updating Lync 2010 databases

Now perform the back end database updates, as detailed on the previous updates page. For example, on the standard edition server:

Install-CsDatabase -Update -ConfiguredDatabases -SqlServerFqdn lyncserver.testdomain.local -UseDefaultSqlPaths

During the database upgrade process, I hit several errors “Exit code: ERROR_RESTRICT_DATABASE_ACCESS (-21)”, further error message detail follows:

Install-CsDatabase -Update -ConfiguredDatabases -SqlServerFqdn lyncserver.testdomain.local -UseDefaultSqlPaths

 Running script: C:\WINDOWS\system32\cscript.exe //Nologo "C:\Program Files\Common Files\Microsoft Ly
 nc Server 2010\DbSetup\DbSetup.wsf" /sqlserver:lyncserver.testdomain.local\db01 /serveracct:EDU001
 \RTCHSUniversalServices /adminacct:EDU001\RTCUniversalServerAdmins /roacct:EDU001\RTCUniversalReadOn
 lyAdmins /role:se /verbose
 ---------------
 Installed SQL Server 2005 Backward Compatibility version is 8.05.2312
 Connecting to SQL Server on lyncserver.testdomain.local\db01
 SqlMajorVersion : 10
 SqlMinorVersion : 50
 SqlBuildNo : 1617
 SQL version is acceptable: 10.50.1617.0
 Default database data file path is E:\MSSQL10_50.DB01\MSSQL\Data
 Default database data file path is E:\MSSQL10_50.DB01\MSSQL\Data
 Default database log file path is E:\MSSQL10_50.DB01\MSSQL\Data
 Opened database rtc
 Opened database rtcdyn
 Error executing alter database [rtcdyn] set restricted_user with rollback immediate
 
---------------
 Exit code: ERROR_RESTRICT_DATABASE_ACCESS (-21)
 ---------------

Although I was a member of the RTC Universal Admins group, and a server admin, my account wasn’t able to modify the Lync databases.

I logged into SQL via the SQL Server Management Studio and added sysadmin SQL permissions for my account. I was then able to run the database and remove the permissions again afterwards.

References

Microsoft: Updates for Lync Server 2010
Microsoft Technet: Lync downloads and updates

Facebooktwittergoogle_plusredditpinterestlinkedinmail

Dealing with SPAM email abuse reports

As any sysadmin responsible for mail systems will know, sometimes email gets relayed that shouldn’t. In this post, we will walk through the process of dealing with a SPAM email abuse report. It’s key to ensure these are dealt with in a timely manor as it will effect the SMTP servers reputation and therefore its ability to send email.

The initial report

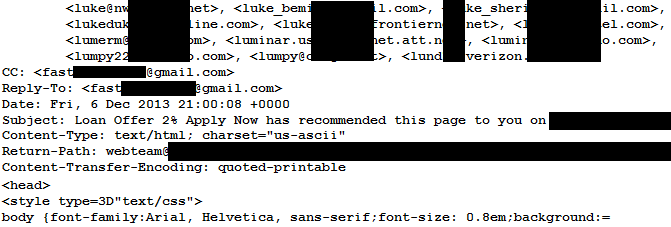
There are a number of ways you may notice SPAM email abuse, however in this case abuse has been reported to us from an external source (eg: Anti-SPAM vendor or ISP).

SPAM Example

Track the source

First of all, we need to track the source of the SPAM messages. Normally you would see all the mail servers in the message headers, with the newest entries appended to the top. This allows you to work back through the mail flow to trace the source server. In this example, all internal mail server headers have been stripped off by the external gateway before finally leaving the sending domains control. While this may seem strange, it prevents external parties from identifying DNS host names, IP addresses and software versions of internal mail servers.

In this example we will track the message through Exchange 2010’s built in Message Flow Troubleshooting. In the event your using another mail server, the principle is the same but you will need to use the relevant tools. Eg: for Exim take a look at /var/log/exim/mail.log.

Exchange Mail Flow Troubleshooting

You will see from the above, we are able to trace both the receive as the message comes to Exchange from the server, and then the send as it leaves to head for the externally facing mail gateway. This allows identification of the source server and will also provide a good indication of how big the issue is, including how long this has been happening, how many messages have been sent, who they have gone to and so on.

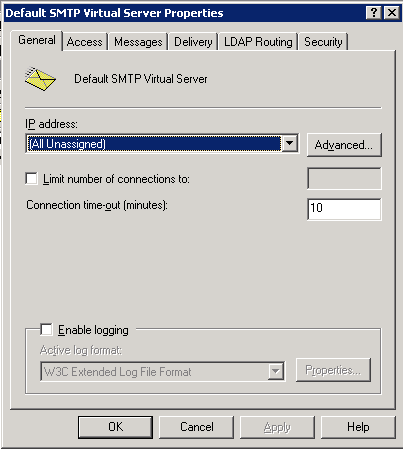
Now we have confirmed the initial report as true, and tracked this to a WWW server we will investigate further. Once on the affected server we find that SMTP server logging is disabled, we already have what we need, but will enable that to assist with future diagnostics. Simply tick the box and ensure you set an appropriate limit and rotation for your environment on the log file.

SMTP Server Settings

Contain the issue

Now the server has been identified, contain the flow of mail by stopping the affected SMTP service and verify there is no more email leaving the mail infrastructure.

Disable SMTP Service

Identify the vulnerability

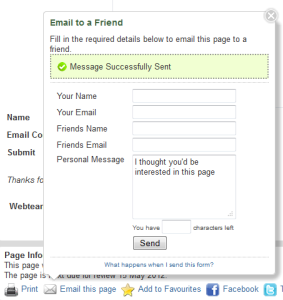
By examining the content of the email message reported as SPAM, and looking at the sites hosted by the server in question, identify the vulnerability. In this case, its a web form that allows a website user to email a 3rd party, with no CAPTCHA or authentication protection. This box also allows more than one ‘friends’ address to be allowed, up to around 200 in fact, simply by comma separating entries.

Lack of Captcha

Repair the fallout

Once the web form has been repaired or removed, you will need to perform a number of remedial tasks.

First off, clear any SPAM messages from the queues on all your mail servers, eg: application server, mail relay and external gateway.

For Exim servers, please see my earlier post: Delete mail from an exim mail queue

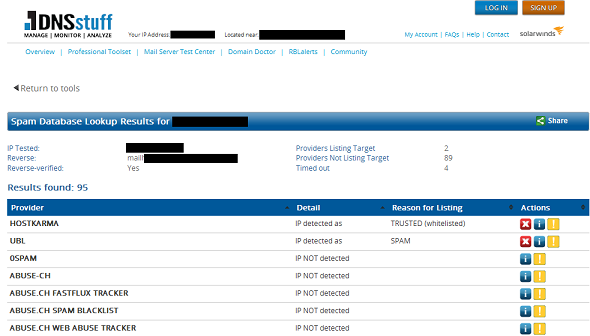
Next, check the damaged reputation of the domain name, DNS host entry of the mail gateway, and IP address of the mail gateway.

Tools such as DNSstuff & SenderBase are a great help here. Do a quick search for email blacklists and double check to see if your listed.

DNS Stuff - Mail Server Blacklist

If the IP/domain is on any lists, follow the process for requesting removal.

Lastly, restart any email services that were halted during the initial phases of the investigation. You should also run a series of checks to ensure there is nothing further wrong with the environment.

Helpful Resources

Facebooktwittergoogle_plusredditpinterestlinkedinmail

Server 2012 R2 – gMSA Accounts and Security

gMSA (Group Managed Service Accounts) come along with the introduction of Server 2012, these aim to increase the security of service accounts by removing static & known passwords. However, they do introduce their own complications.

Legacy Service Accounts

If your running a Microsoft infrastructure of any size, there is little doubt that you will have a number of service accounts within Active Directory used by software and automated tasks throughout your environment.

These service accounts commonly have the passwords set to never expire and end up written in a list, as the passwords will be required from time to time. In the past, several steps could easily be taken to start to mitigate the risks, including:

  • Set a long and complex password
  • Store the password in a secure location (Password Vault)
  • Limit access to the credentials
  • Change them periodically or after key staff leave the team/organisation

There is now another route to securing these accounts, in comes Group Managed Service Accounts (gMSA). There are some great resources online to do with configuring these (some below), but this guide aims to cover the basics to get you running, which I needed while deploying AD FS on Server 2012 R2.

Create the Key Distribution Services KDS Root Key

Before you can use gMSA in Server 2012 R2, you need to perform the one time operation of generating the KDS root key. I found a number of blogs/howtos online while, but couldn’t get this running in my environment to start with for two reasons.

1. You will require a Server 2012 R2 domain controller within the forest root domain (We only had one in the child domain initially).

2. On the Windows Server 2012 domain controller, run Windows PowerShell from the Taskbar as an Administrator. (Right click, Run As Administrator)

At the command prompt type the following commands, and then press ENTER:

To create the KDS root key in a production environment

Add-KdsRootKey –EffectiveImmediately

To create the KDS root key in a test environment for immediate effectiveness

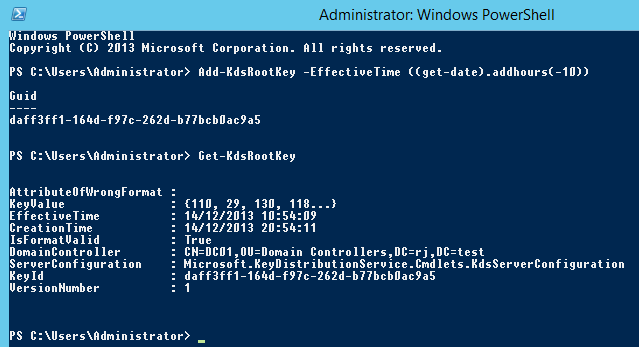
Add-KdsRootKey –EffectiveTime ((get-date).addhours(-10))

Creating the KDS Root Key

Also see: http://technet.microsoft.com/en-us/library/jj128430.aspx

Setup the gMSA account

Create a security group and add the computer accounts for the servers that will use this account to the group.

Now create the account

New-ADServiceAccount -name gmsa1 -DNSHostName gmsa1.jervis.local -PrincipalsAllowedToRetrieveManagedPassword "gmsa-gmsa1grp"

Creating the gMSA account via New-ADServiceAccount

Configure a service

Login to the 2012 target server and from a PowerShell prompt running ‘As Administrator’

PS C:\Windows\system32> Add-WindowsFeature RSAT-AD-PowerShell

Success Restart Needed Exit Code      Feature Result
------- -------------- ---------      --------------
True    No             Success        {Remote Server Administration Tools, Activ...


PS C:\Windows\system32> Install-ADServiceAccount gmsa-gmsa1
PS C:\Windows\system32> Test-ADServiceAccount gmsa-gmsa1
True
PS C:\Windows\system32>

You will now need to change your service to run as the gMSA account, for example:
Capture

Possible Issues

  • You need at least one 2012 Domain Controller
  • Servers that will use the gMSA account need to run Server 2012
  • If you plan to use these with SQL, you must use SQL 2012, or SQL 2012 Express
  • Your application must support gMSA
  • Any other task or service (on the gMSA target server) could use that gMSA account to run.

Security Considerations

You need to consider the overall security of the servers and environment. In most cases, if your able to use a gMSA account, its likely to increase security mainly due to the automatic management of passwords.

More secure: As the admin that has left can’t login to your servers with his account as its disabled and he does not have any service account passwords.

Less secure: As any admin on a server granted to use a gMSA account could map any number of tasks and services to run under that account on that server. (Only have trust worthy admins)

A nasty hole could be a batch file that is in a publicly writeable share, which runs regularly as a gMSA account that has domain admin privileges. This is true of any account and not just gMSA, but consider how easy it would be to just enter that username against any service or task thats being created.

As always you need to provision following the principal of least privilege, and educate admins in how these accounts can be used to increase security while reminding them how issues could occur.

Sometimes it maybe best to use a gMSA account, sometimes a standard user account (with tight password management).

References

Windows Server 2012: Group Managed Service Accounts – Ask Premier Field Engineering (PFE) Platforms
Managed Service Accounts: Understanding, Implementing, Best Practices, and Troubleshooting
Using Group Managed Service Accounts – Dragos Madarasan

Facebooktwittergoogle_plusredditpinterestlinkedinmail

Micorsoft UAG 2010 and IE 11 Clients

UPDATE: Microsoft have since released Forefront Unified Access Gateway 2010 Service Pack 4, this should resolve issues with IE 11 clients.

At the time of writing Internet Explorer 11 clients are not currently supported by Unified Access Gateway 2010 and Microsoft are yet to release an update for UAG server to do so. In the mean time, there is a workaround to access a UAG portal from Internet Explorer 11 by using compatibility view.

What do users see?

Mobile Access Portal
Your device does not meet access policy requirements for this site.
Your computer does not meet the security policy requirements for this site. For more information, contact your administrator.

They will see one of these two UAG 2010 screens:

Mobile Access Portal

Mobile Access Portal

Simple workaround change Required

Add the site to the ‘compatibility view’ sites list, available via the ‘cog’ icon:

Compatibility view

Restart IE. You may need to clear your browser cache.

Was this of use? Please let me know.

Facebooktwittergoogle_plusredditpinterestlinkedinmail

distributed.net client RPM Package

This week I decided to dust off my RPM hat and build an RPM for the distributed.net client application.  Firstly to test my setup here and secondly to make the client easier to deploy and remove from my systems.  I have packaged the core DNETC application (v2.9104.510), and added my own DNETC System V init script

I thought I would post the files here, as they maybe of use. 

dnetc-2.9104.510-2.i386.rpm
dnetc.spec
dnetc.init

Spec File:

Summary: distributed.net Client
Name: dnetc
Version: 2.9104.510
Release: 2
Source0: dnetc-2.9104.510.tar.gz
License: UNKNOWN
Group: UNKNOWN
BuildArch: i386
BuildRoot: %{_tmppath}/%{name}-buildroot

%description
This distributed.net client will make your computer a part of the world's largest computer, distributed.net. The client is capable of working on two of distributed.net's ongoing projects: The brute-force decryption of a RC5-72 message, and the search for Optimal Golomb Rulers (OGR). Both are long-term projects that will go on for some time. (http://www.distributed.net)

%prep

%setup -q

%build

%install
install -m 0755 -d $RPM_BUILD_ROOT/etc/init.d
install -m 0755 init/dnetc $RPM_BUILD_ROOT/etc/init.d/dnetc
install -m 0755 -d $RPM_BUILD_ROOT/opt/dnetc
install -m 0755 dnetc $RPM_BUILD_ROOT/opt/dnetc/dnetc
install -m 0755 dnetc.1 $RPM_BUILD_ROOT/opt/dnetc/dnetc.1
install -m 0755 -d $RPM_BUILD_ROOT/opt/dnetc/docs/
install -m 0755 docs/readme.1st $RPM_BUILD_ROOT/opt/dnetc/docs/readme.1st
install -m 0755 docs/readme.linux $RPM_BUILD_ROOT/opt/dnetc/docs/readme.linux
install -m 0755 docs/readme.uclib $RPM_BUILD_ROOT/opt/dnetc/docs/readme.uclib
install -m 0755 docs/CHANGES.txt $RPM_BUILD_ROOT/opt/dnetc/docs/CHANGES.txt
install -m 0755 docs/dnetc.txt $RPM_BUILD_ROOT/opt/dnetc/docs/dnetc.txt

%clean
rm -rf $RPM_BUILD_ROOT

%post
echo " "
echo "This will display after rpm installs the package!"

%files
/etc/init.d/dnetc
%dir /opt/dnetc
/opt/dnetc/dnetc
/opt/dnetc/dnetc.1
%dir /opt/dnetc/docs/
/opt/dnetc/docs/readme.1st
/opt/dnetc/docs/readme.linux
/opt/dnetc/docs/readme.uclib
/opt/dnetc/docs/CHANGES.txt
/opt/dnetc/docs/dnetc.txt

%changelog
* Wed Feb 24 2010 Rob Jervis 
- added my own dnetc System V init script (http://www.jervis.ws/2010/01/22/dnetc-system-v-init-script/)

* Tue Feb 23 2010 Rob Jervis 
- First RPM package of core dnetc v2.9104.510 for EL5

dnetc.init script:

#!/bin/bash
#
# dnetc This shell script takes care of starting and stopping distributed.net client
#
# chkconfig: 345 90 12
# description: distributed.net client program, a \
# distributed computing project. The program \
# uses only the computers idle time.
# processname: dnetc

# config: /etc/dnetc/dnetc.ini
# pidfile: /var/run/dnetc.pid

# Get function from functions library
. /etc/init.d/functions

start() {
echo -n "Starting DNET client: "
/opt/dnetc/dnetc -quiet
touch /var/lock/subsys/dnetc
success $"DNET client startup"
echo
}

stop() {
echo -n "Stopping DNET client: "
killproc dnetc
rm -f /var/lock/subsys/dnetc
echo
}

# ......................
case "$1" in
start)
start
;;
stop)
stop
;;
status)
status dnetc
;;
restart|reload|condrestart)
stop
start
;;
*)
echo $"Usage: $0 {start|stop|restart|reload|status}"
exit 1
esac

exit 0

Distributed.net recommend that you only download and install clients from their site, I have packaged the above and use it on my systems so the choice is yours, but if you wish to build your own RPM, the spec file etc may save you a few mins.

Facebooktwittergoogle_plusredditpinterestlinkedinmail

Annoying Windows Update restart popup

I was working away on my PC today and was getting bugged by the Windows Update restart reminder, having been bitten by its restart in the past I wanted it to leave me alone.

I had stacks of SSH sessions open, web sites and files, it was not the time for a reboot and I didn’t want it to decide to restart when I got up to make a drink.

A quick google search helped me out!  Running this command (from a run prompt or from within a command prompt) will stop the message appearing and allow you to continue working, uninterrupted and reboot when your good and ready.

sc stop wuauserv

Source: Lifehacker

Facebooktwittergoogle_plusredditpinterestlinkedinmail

Building RPMs

Here is some advice I found useful when setting up my RPM build environment, and building a basic RPM.  The main source I used, to save reading my book again or the man pages, was Linc Fessenden’s blog and some of Linc’s blog is repeated here for completeness. Thanks Linc!

These instructions should work fine on any CentOS / RHEL / Fedora system.

First off, we need the rpm-build package to be installed. Check and install if needed.

yum install rpm-build

Login to the system as your user account, then make the following directories:

mkdir -p ~/rpm
mkdir -p ~/rpm/BUILD
mkdir -p ~/rpm/RPMS
mkdir -p ~/rpm/SOURCES
mkdir -p ~/rpm/SPECS
mkdir -p ~/rpm/SRPMS
mkdir -p ~/rpm/tmp

And create an ~/.rpmmacros file with the following in it:

%packager Your Name
%_topdir /home/YOUR USERNAME/rpm
%_tmppath /home/YOUR USERNAME/rpm/tmp

Now you need to create a package source code ditectory in the ~/rpm/SOURCES directory. You should name it package name – major revision number. Eg: ~/rpm/SOURCES/robspackage-1. In that directory place all the files that you wish to package in the RPM. I have put “script.sh” in mine.

Once that is done, make a tarball of that directory in the ~/rpm/SOURCES directory named programname-revision.tar.gz. Eg:

cd ~/rpm/SOURCES
tar -czvf rob-1.tar.gz rob-1/

In the ~/rpm/SPECS directory, create a packagename.spec file for your package.
Eg: rob.spec:

Summary: My first rpm package
Name: rob
Version: 1
Release: 1
Source0: rob-1.tar.gz
License: GPL
Group: CustomGroup
BuildArch: noarch
BuildRoot: %{_tmppath}/%{name}-buildroot
%description
Relevant package description
%prep
%setup -q
%build
%install
install -m 0755 -d $RPM_BUILD_ROOT/opt/rob
install -m 0755 script.sh $RPM_BUILD_ROOT/opt/rob/script.sh
%clean
rm -rf $RPM_BUILD_ROOT
%post
echo " "
echo "This will display after rpm installs the package!"
%files
%dir /opt/rob
/opt/rob/script.sh
%changelog
* Wed Feb 24 2010 Rob Jervis
- added something or fixed a bug

* Tue Feb 23 2010 Rob Jervis
- First RPM package of the rob application for EL5

Direct Quote from Linc:
“The install lines tell rpm what to install where and with what permissions. You also have to do any directory creation there as well (the one with the -d in the line).”

“The things after %file are similar in that this tells rpm’s database which files are attached to this package. The %dir signifies a new directory, otherwise the files are listed with their complete paths.”

Now you need to create the package:

cd ~/rpm
rpmbuild -ba SPECS/rob.spec

If your package builds ok, it will end up in the RPMS directory, in this case: ~/rpm/RPMS/noarch/rob-1-1.noarch.rpm.

If it fails to build, first check your spec file carefully. Enjoy!

Facebooktwittergoogle_plusredditpinterestlinkedinmail