A real world answer to remembering passwords

Click here to try LastPass and go premium for all the features for only $12 per year.

Today someone asked me how they could better manage their passwords, they were becoming annoyed at the number of ‘password reset’ requests they were making to sites because they simply couldn’t remember them.

Option 1 – I wouldn’t recommend…

Option 2 – LastPass Free (or even better, Premium for $12 per year) sounds a much better option…

lastpass-logo
Click here to try LastPass and go premium for all the features for only $12 per year.

Enjoy.

Facebooktwittergoogle_plusredditpinterestlinkedinmail

RJ-PhotoDownloader.bat – batch file photo downloader

batchfileRJ-PhotoDownloader is a basic batch photo download script. I wrote it for a specific task, where photos needed to be downloaded regularly and quickly from a camera memory card where this script was called from a longer semi-automated process.

RJ-TimeLogger can run on any Windows system, but does require one additional application for the USB unmount to work. This application is called DevEject and is available freely here (English Translation). You will need to place it in the same directory as the RJ-PhotoDownloader.bat file.

This script can be used as is, or as snippet for a script your building. Hope it’s of use…

RJ-PhotoDownloader.bat

@ECHO OFF
cls
title RJ-PhotoDownloader
echo RJ-PhotoDownloader v0.3
echo.

set date=%DATE:~6,4%-%DATE:~3,2%-%DATE:~0,2%

REM Set the folder paths with NO trailing slash
REM My camera is normally mounted as H: if the printer is on or G: if not.
set photopath="C:\Documents and Settings\All Users\Documents\My Pictures\Downloaded"
set campath="G:\DCIM\100KM002"

mkdir %photopath%\%date%
move %campath%\* %photopath%\%date%\
pause

echo.
echo Ejecting the camera...
echo.
call deveject.exe -EjectDrive:G:
echo.
echo All done!
pause
REM - End of file
Facebooktwittergoogle_plusredditpinterestlinkedinmail

Set AD IP Phone based on Lync LineURI value (set-adipphone-from-lineuri.ps1)

I wrote this quick PowerShell script when I needed to import some phone number data from the Lync Line URI attributes within Lync 2010 and place it in Active Directory.

This script is provided as-is, and I hope it provides you a head start if your looking to complete a similar task. You will need to customise the script to your requirements, in my case I needed 4 digit extension numbers from the Lync Line URI to be held within the AD IPPhone attribute, a one off task to back-port some data into AD before I used set-lineuri-from-ad.ps1 for future Line URI updates.

To test this command, you could restrict its scope by matching a specific user, eg: Get-CsAdUser -LdapFilter “IPPhone=1234”, or by OU as shown in the script. You also need to set the if statement as required.

# set-adipphone-from-lineuri.ps1
# Back-port 1xxx number from users Lync lineuri into their AD IPPhone attribute.
# 2013-07-25 - R. Jervis

Import-Module ActiveDirectory

#$RJUsers = Get-AdUser -Filter {msRTCSIP-Line -like "tel:+1*"} -Properties *
$RJUsers = Get-AdUser -LDAPFilter "(msRTCSIP-Line=tel:+1*)" -SearchScope Subtree -SearchBase "OU=Test Users,DC=test,DC=local" -Properties *

foreach ($user in $RJUsers)
    {
        Write-Host ---------------------------------------------------------------------------------
        Write-Host Back porting $user.SamAccountName with LineURI $user["msRTCSIP-Line"] -NoNewLine ; Write-Host
	$RJURI = $user."msRTCSIP-Line"
        $RJURI = $RJURI.Substring(5,4)
	Write-Host $RJURI
	Write-Host $user.ipphone

        if ($RJURI -like '1234') {
           echo "Lync Ext: $RJURI"
           $RJUserMod = Get-ADUser $user.SamAccountName -Properties ipPhone
           $RJUserMod.ipPhone = $RJURI
           Write-Host SETTING USER!
           Set-ADUser -instance $RJUserMod
           } 
    }
Facebooktwittergoogle_plusredditpinterestlinkedinmail

Set Lync LineURI based on AD IP Phone value (set-lineuri-from-ad.ps1)

I wrote this quick PowerShell script in August last year, when I needed to set several thousand Line URI attributes within Lync 2010 based on values present in AD. This script looks for IP Phone values starting with the number 1 as can be seen within the opening command. It then uses the IPPhone and Telephone attributes in AD to set a Line URI value.

This script is provided as-is, and I hope it provides you a head start if your looking to complete a similar task. You will need to customise the script to your requirements, in my case I needed 4 digit extension numbers from AD to be held within the Lync Line URI.

To test this command, you could restrict its scope by matching a specific user, eg: Get-CsAdUser -LdapFilter “IPPhone=1234”

Before I could use this I had to back-port some data from the Lync LineURI attribute, see set-adipphone-from-lineuri.ps1 for more details.

# set-lineuri-from-ad.ps1
# Sets users Lync LineURI based on the IPPhone and Telephone attributes in AD.  
# 2013-07-25 - R. Jervis (www.jervis.ws)

$RJUsers = Get-CsAdUser -LdapFilter "IPPhone=1*"

foreach ($user in $RJUsers)
    {
        echo $user.SamAccountName
        $phoneNumber = $user.Phone
        #echo "User Phone Number $phoneNumber"
        $phoneNumber = $phoneNumber -replace "[^0-9]"
        #echo "User Cleaned Number: $phoneNumber"
        $phoneNumber = $phoneNumber.substring($phoneNumber.length - 4, 4)
		#echo "User Ext Number: $phoneNumber"
		if ($phoneNumber -eq $null) { Write-Host "NULL VALUE" } else { Write-Host "ABC" }
		$phoneNumber = "tel:+" + $user.IPPhone + ";ext=" + $phoneNumber
        echo "Lync Line URI: $phoneNumber"
        Set-CsUser -Identity $user.Identity -LineUri $phoneNumber
        echo ------------------------------------
    }
Facebooktwittergoogle_plusredditpinterestlinkedinmail

Build a Lync 2013 Lab: Part 5 – Lync AD prep, Prereqs & initial topology

Microsoft Lync 2013The next stage of the process is to complete the Lync AD prep, install the prerequisites on the first front end server, deploy management tools and design the initial topology.

Install Prerequisites

First login to the first server in your new Lync 2013 Front End pool. We will use this as the initial point of administration, feel free to appoint a separate management machine if you wish however you can deploy the relevant management tools there later.

Mount the Server 2012 R2 media and update the source parameter in the following command (e.g. D:\sources\sxs) with the correct location for your environment.

Install the required prerequisites including the server administration tools followed immediately by a server reboot. As per Jeff’s recommendations, I too would install Telnet Client at the same time.

From a PowerShell prompt, running as administrator, enter:

Install-WindowsFeature RSAT-ADDS, Web-Server, Web-Static-Content, Web-Default-Doc, Web-Http-Errors, Web-Asp-Net, Web-Net-Ext, Web-ISAPI-Ext, Web-ISAPI-Filter, Web-Http-Logging, Web-Log-Libraries, Web-Request-Monitor, Web-Http-Tracing, Web-Basic-Auth, Web-Windows-Auth, Web-Client-Auth, Web-Filtering, Web-Stat-Compression, Web-Dyn-Compression, NET-WCF-HTTP-Activation45, Web-Asp-Net45, Web-Mgmt-Tools, Web-Scripting-Tools, Web-Mgmt-Compat, Windows-Identity-Foundation, Desktop-Experience, Telnet-Client, BITS -Source D:\sources\sxs -Restart

(Thanks to Jeff Schertz for the PowerShell, he has a great article for deploying a 2013 standard edition server, plus loads more)

Active Directory Preparation

The next stage of the process is to prepare Active Directory for the Lync 2013 installation. This post covers a green field deployment and is easily adjusted for a Lync 2010 to 2013 upgrade. Upgrades from OCS 2007 R2 are supported by Lync 2013, but earlier versions directly are not. If your running an earlier version of OCS/LCS, please check the details on TechNet.

BACKUP, BACKUP, BACKUP. Remember to take the correct precautions on your environment before applying schema updates. If a schema update fails, you could be looking at a restore. You have been warned. If you don’t know what your doing, call someone in now.

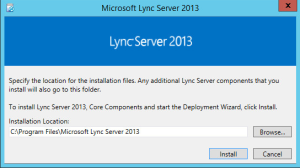
Mount the media and install the deployment wizard.
Lync 2013 FE Prep - 1 Start Install

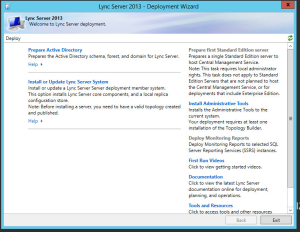
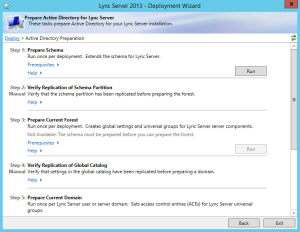
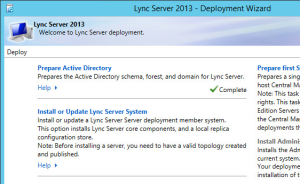
Once the deployment wizard is running, you will need to select ‘Prepare Active Directory’.
Lync 2013 FE Prep - 2 Deployment Wizard

Now follow each step in turn, completing the action and then completing the verification. I have outlined the main steps here but please refer to the ‘in wizard’ instructions for prerequisites and verification steps, they contain all you need.
Lync 2013 FE Prep - 3 AD Prep

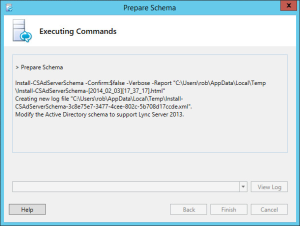
Next choose ‘Prepare Schema’, full details of the prerequisites for this step are included within the deployment wizard, therefore I will not repeat them here.

Lync 2013 FE Prep - 4 AD Prep Schema

Once complete, follow the guidance provided to verify replication of the schema partition.

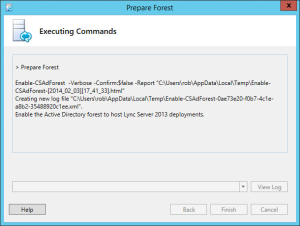
Next choose ‘Prepare Current Forest’, full details of the prerequisites for this step are included within the deployment wizard, therefore I will not repeat them here.

In environments where Lync is being installed into a child domain within a forest, you may need to complete this stage on a forest root domain controller. For example, if you are installing Lync into the testdomain.testforest.local domain, and you have completed these stages on lyncfe01.testdomain.testforest.local, then the perpare forest stage should be run from a member server within the testforest.local domain.

Remember that to prepare the forest schema you will need to use an Enterprise Admin account.

Lync 2013 FE Prep - 5 AD Prep Forest

As always, review the logs and ensure all has completed successfully. Then verify replication of global catalog, instructions are provided within the wizard.

Lync 2013 FE Prep - 6 AD Prep Forest Logs

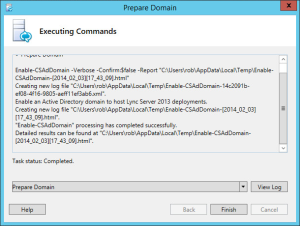
Lastly, we need to ‘Prepare Current Domain’ which will allow it to support Lync 2013 deployments.

Lync 2013 FE Prep - 7 AD Prep Domain

Lync 2013 FE Prep - 8 AD Prep Domain Log

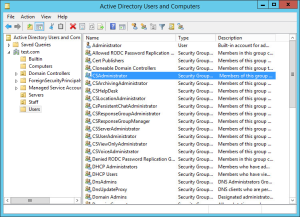
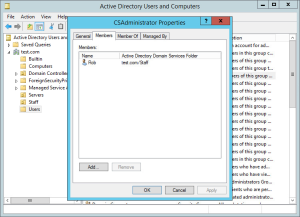
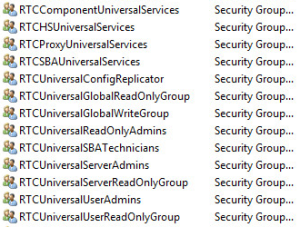
Now all that scary schema work is out of the way, we need to add the Lync administrators into the relevant groups. There will be a range of groups that have been created, all OCS/Lync groups either start RTC or CS. At this stage, just add your main Lync administrators (their privileged accounts rather than their standard accounts) to the CSAdministrator group. Help desk staff can be configured later by adding them into the relevant groups.

Lync 2013 FE Prep - 9 AD Prep CSAdministrator

Lync 2013 FE Prep - 10 AD Prep CSAdministrator

Lync 2013 FE Prep - 11 AD Prep AD Groups

Lync 2013 FE Prep - 12 AD Prep Complete

Once we have completed the Lync Active Directory Preperation, your ready to move forward.

Management Tools

From the front screen of the deployment wizard, click the ‘Install Administrative Tools’ link. You can install these tools where you feel they are required. I personally like to install them on the first FE server within the pool, eg: lyncfe01.test.com and also a management terminal.

Topology

The key to moving your deployment forward now, is to define the inital topology. Here we will define the relationships with the file store, WAC servers and database servers we build in the earlier posts.

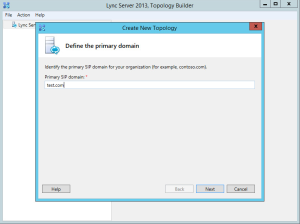
Define the SIP domain name
Lync 2013 FE Topology - 01 SIP Domain

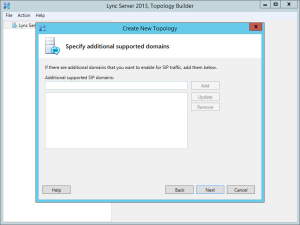
Specify any additional SIP domain names you require
Lync 2013 FE Topology - 02 Additional SIP Domains

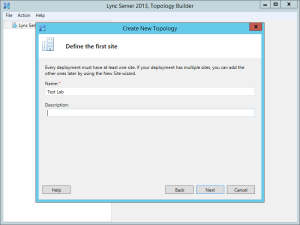
Define the name of your site
Lync 2013 FE Topology - 03 Define Site

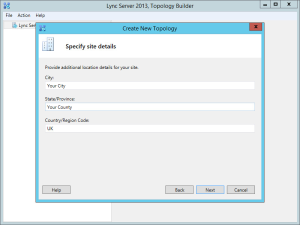
Fill in the relevant location information
Lync 2013 FE Topology - 04 Site Details

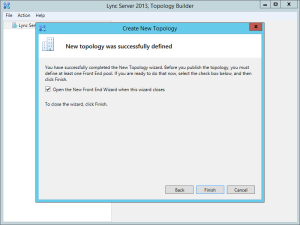
Ensure you start the ‘New Front End Wizard’ next…
Lync 2013 FE Topology - 05 Site Summery

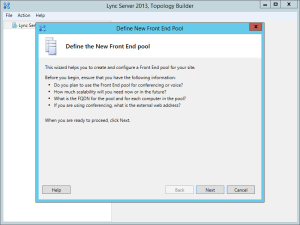
Lync 2013 FE Topology - 06 New Pool

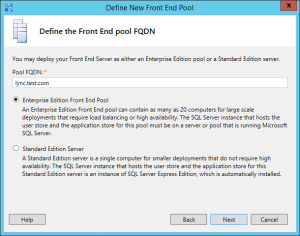
Define the pool FQDN
Lync 2013 FE Topology - 07 Pool Type and FQDN

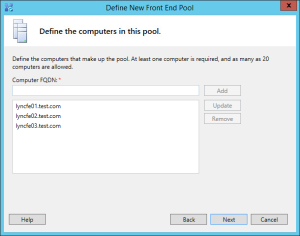
Define the pool member names, in our lab you should include all three.
Lync 2013 FE Topology - 08 Pool Members

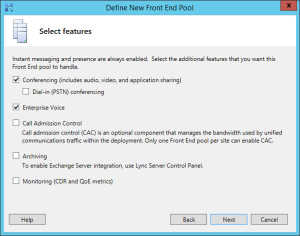
Select the features you wish to enable. Others can be enabled later, if you are deploying this pool into an environment with Lync 2010 currently running, this example is a good starting point. Within the lab, you could also enable Call Admission Control (CAC) and Conferencing, Archiving and Monitoring now if you wish, but I will cover adding these in a later post.
Lync 2013 FE Topology - 09 Pool Features

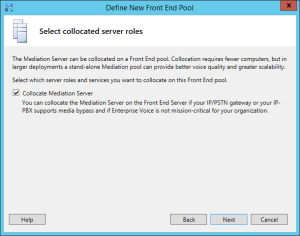
We will collocate the mediation server, this reduces the total number of servers we need to deploy and ensures there are three servers running this role. Decisions here come down to sizing and design.
Lync 2013 FE Topology - 10 Collocated Roles

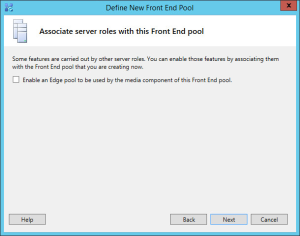
We will not deploy edge services at this stage.
Lync 2013 FE Topology - 11 Enable Edge

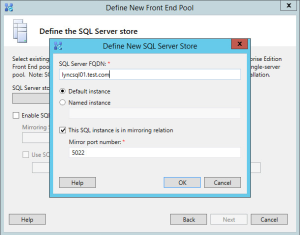
Configure the main backend SQL server
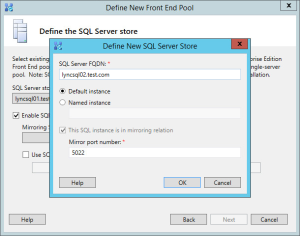
Lync 2013 FE Topology - 12 SQL Server Store

Configure its mirror
Lync 2013 FE Topology - 13 Mirror SQL Server Store

Define the DFS file store location
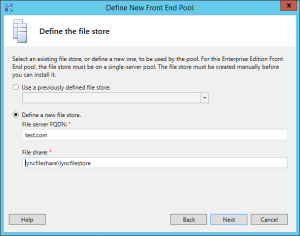
Lync 2013 FE Topology - 14 File Store

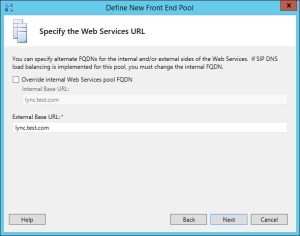
Specify the internal and external URLs for the web services as required.
Lync 2013 FE Topology - 15 Web Services URL

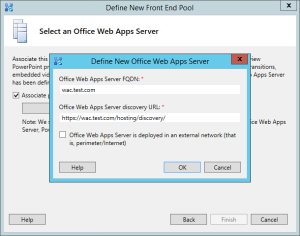
Define the WAC farm we configured earlier.
Lync 2013 FE Topology - 16 Office Web Apps

Review your topology and ensure its correct.
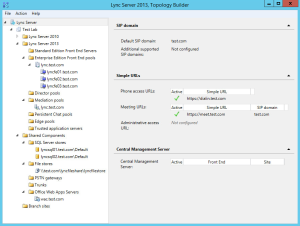
Lync 2013 FE Topology - 17 Overview

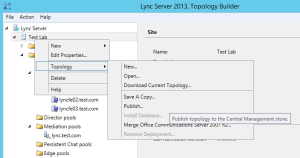
Now right click on your site, and select ‘Topology’, then ‘Publish’.
Lync 2013 FE Topology - 18 Choose Publish

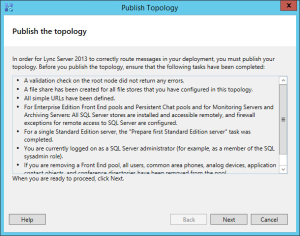
Review the requirements to ensure you meet them all, then select next to start the publishing of your initial Lync topology. This will setup the servers configuration based on the server names etc supplied within the topology.
Lync 2013 FE Topology - 19 Publish Wizard

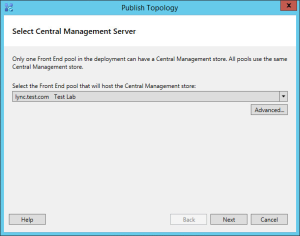
Choose which pool will host the Central Management Store (CMS), in a green field site, such as our lab, it will be this pool.
Lync 2013 FE Topology - 20 Select Central Management Store CMS Pool

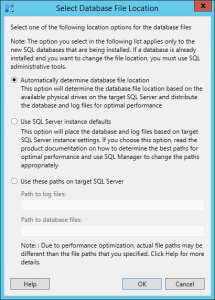
We have no CMS currently and our SQL servers have only just been built, so the location for the files needs to be set to automatic or defined if required.
Lync 2013 FE Topology - 21 CMS Location

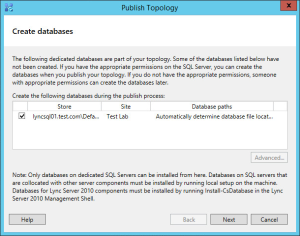
Review how the databases will now be created.
Lync 2013 FE Topology - 22 Create CMS Databases

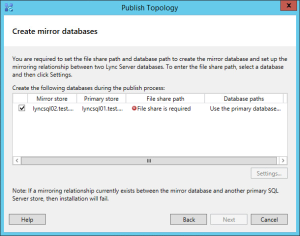
A shared and writeable location needs to be defined, that both servers can access and have Read/Write access too. This will be used in the initial build of the mirror databases. You should ensure share and NTFS permissions are set to allow your account and the SQL service account access.
Lync 2013 FE Topology - 23 Create Mirror Databases

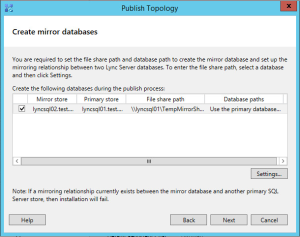
Review the settings for the creation of the SQL mirror databases.
Lync 2013 FE Topology - 24 Create Mirror Databases

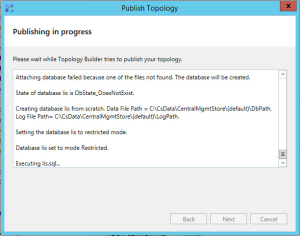
Sit back for a few minutes and watch your new Lync topology being built.
Lync 2013 FE Topology - 25 Publish Topology

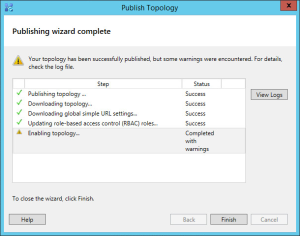
Review the completion summery page for issues. It appears we have 1 area with warning(s), any issues should be worked through and resolved at this stage.
Lync 2013 FE Topology - 26 Publish Topology

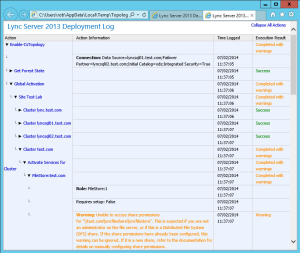
Whenever you get a warning or an error, you should click on the ‘View Logs’ link and look through the output. They are nested and very readable, so expand out to the detail and review the log entries. In this case we have a warning which states “Warning: Unable to access share permissions”, then goes on to say “This is expected if you are not an administrator on the file server, or if this is a Distributed File System (DFS) share.” In our case its a DFS share, so all is well.
Lync 2013 FE Topology - 27 Publish Topology Logs

References & Further Reading

Jeff Schertz: Lync Server 2013 Deployment – Part 1

Facebooktwittergoogle_plusredditpinterestlinkedinmail

Windows 2008 Cluster – Extend Volume option greyed out!

From time to time, volume sizes have to be increased to allow for data growth and today is no exception. If your increasing the storage on a Windows 2008 SQL cluster, you may find the following information useful.

After I increased the storage presented from the SAN to the host (using the SAN tools) and completed a rescan, the extend volume option greyed out.

Disk Management

After a little research, I found diskpart provided a quick answer to my problem. (Remember to backup your data.)

diskpart

Cluster Management

Extended Volume

Hope this helps…

Facebooktwittergoogle_plusredditpinterestlinkedinmail

Build a Lync 2013 Lab: Part 4 – High Availability Lync File Store with DFS

During your deployment of Lync you will need to provision the file store, and my Lync 2013 Lab series covers deploying the whole environment in a full High Availability configuration. We will apply the same logic to the Lync File Store and use Distributed File System (DFS) to help us achieve it.

This will be a whistle stop tour of creating all you need within DFS to support the Lync file store, you may wish to follow my further reading links for more detail on DFS. Also Jeff Schertz’s Blog article ‘Breaking Down the Lync File Share’ comes highly recommended, his blog contains loads of amazing Lync content.

To use a DFS, Lync Server 2013 requires the following:

  • Namespaces are domain based
  • All namespace servers are running a minimum of Windows 2008

Create the shares

First of all, we will need to provision a minimum of two shares that will be kept in sync and will act as ‘DFS targets’. In a standard edition deployment, its possible to co-locate the file store on the standard edition front end server. In an enterprise pool you can’t locate the file store on your front end servers, you should instead locate an appropriate alternative within your environment to place the file store. Considerations should include: Network segment choice, Security, Availability, Access times / latency.

Within the lab we will use the SQL servers. Login to both SQL servers, LYNCSQL01 and LYNCSQL02 then create and share “c:\LyncFileStore”.

“Lync Server 2013 setup requires that permissions on shared folder allow full access to Administrator. Lync Server 2013 will then use NTFS file permissions to ACL the folders. Inherited DFS share permissions will not be used to restrict access.” Source TechNet

Apply the following NTFS permissions:
Administrators Group – Full Control

Share the folder and then apply the following share permissions:
Everyone – Full Control
Permissions are then controlled via NTFS permissions, it maybe possible to reduce the share permissions here, but I have not tested that configuration fully.

Install DFS

Install the DFS Replication feature on each server that will host a target folder, in the case of our lab, this will be LYNCSQL01 and LYNCSQL02.

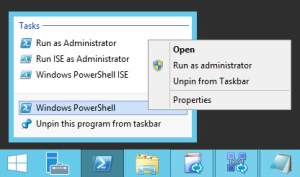
Open PowerShell as an administrator:

Running PowerShell as an administrator

Run the following command to install DFS Replication:

Add-WindowsFeature FS-DFS-Replication

DFS 1 Add FS-DFS-Replication

Install the DFS Namespace role on each server that will host the Namespace, in the case of our lab, this will be DC01. Open PowerShell as an administrator and run:

Add-WindowsFeature FS-DFS-Namespace

DFS 2 Add FS-DFS-Namespace

Install the DFS Management Tools on each system that will manage DFS, in the case of our lab we will keep it simple and use DC01. Open PowerShell as an administrator and run:

Add-WindowsFeature RSAT-DFS-Mgmt-Con

DFS 3 Add RSAT-DFS-Mgmt-Con

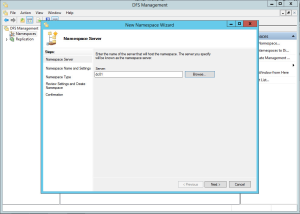
Create DFS Namespace

Before we can publish a folder through DFS, there has to be a Namespace. This will contain a collection of folders that are visible to users, it’s in affect the top level container.

DFS 4 New Namespace Server

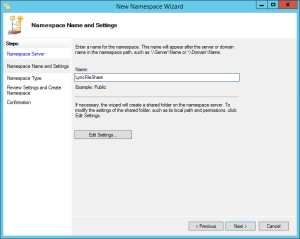
Provide a name, this will be its published name.

DFS 5 New Namespace Name

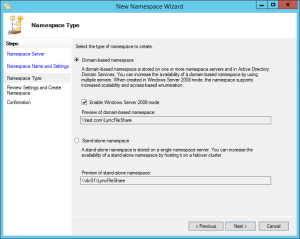
Select a Namespace type, either domain or standalone. This choice mainly comes down to vendor/application support, organisational policy or security considerations, although in reality cost and personal preference also play a part.

Domain based (as we will use in the lab) provides the most simple HA DFS configuration. In order to make a standalone Namespace HA, you would need to configure two servers to host it via a shared cluster resource increasing cost and complexity.

Microsoft does state that when using DFS, Lync Server 2013 requires that Namespaces are domain based. I have not tested standalone namespaces personally and due to the support statement, recommend you use domain based.

DFS 6 New Namespace Type

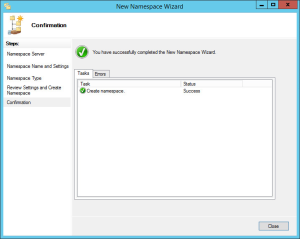
DFS 7 New Namespace Complete

Create New DFS folder and configure DFS replication

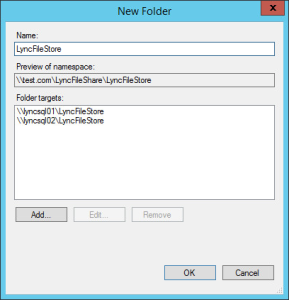
Now create your folder within the Namespace, you will need to define the full path to each members share.

\\lyncsql01\LyncFileStore
\\lyncsql02\LyncFileStore

DFS 8 New Folder

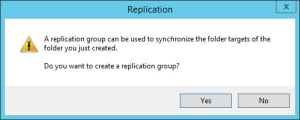
When asked if replication should be configured, choose yes.

DFS 9 New Folder Replication

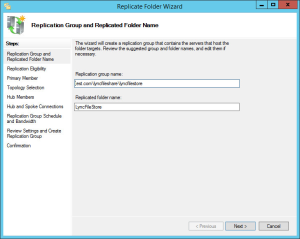
Replicated group name & replicated folder name should already be set.

DFS 10 Replicate Name

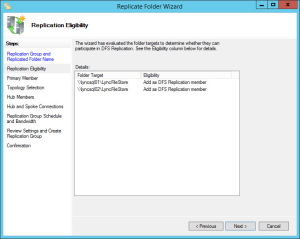
Verify the target paths are correct.

DFS 11 Replicate Targets

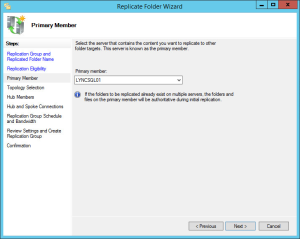
Select one of the members as a primary server.

DFS 12 Replicate Primary

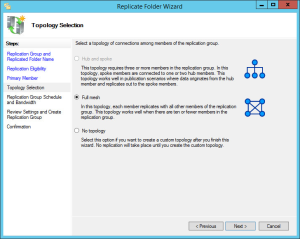
Choose your topology, I would recommend ‘Full mesh’ for this usage. This will ensure all members are kept up to date with each other, in all directions.

DFS 13 Replicate Topology

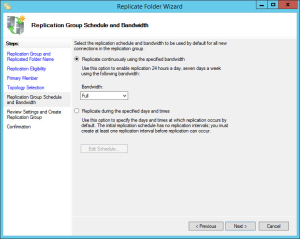
In this case, both of the servers are on a high speed internal data network, and we are configuring this for HA, therefore we don’t want to restrict replication speed too much. Apply an appropriate limit for your environment, or leave it set to Full. In my lab, we will use Full to ensure there is minimal sync delay.

DFS 14 Replicate Bandwidth

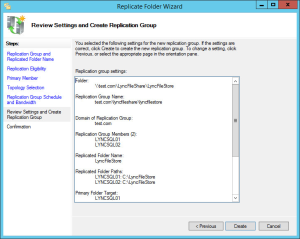
Review your configuration and go back and make any corrections that are required.

DFS 15 Replicate Summery

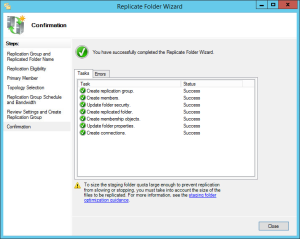
Ensure deployment is successful, if there are any errors ensure they are checked and the wizard is run again successfully.

DFS 16 Replicate Complete

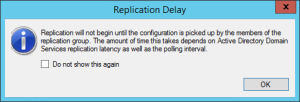
Note the replication delay notice, this is normal.

DFS 17 Replicate Notice

Review Configuration

Navigate through the DFS Management Console and verify your new Namespace, folder and replication group are correctly setup. Take this opportunity to familiarise yourself with the DFS Management Console.

DFS 18 Replicate Overview

References & Further Reading

Jeff Schertz’s Blog: Breaking Down the Lync File Share
TechNet: DFS Namespaces and DFS Replication Overview
TechNet Blogs: DFS Replication in Windows Server 2012 R2: If You Only Knew the Power of the Dark Shell
TechNet Blogs: DFS Replication in Windows Server 2012 R2: Revenge of the Sync

Next time…

In the next post, I will move on to Active Directory preparation, Front End Prerequisites and Deploying the initial topology.

Facebooktwittergoogle_plusredditpinterestlinkedinmail

RJ-TimeLogger.bat – batch file time recording

RJ-TimeLogger is a basic batch file time recording application / script. I wrote it for a specific task, and thought I would share it.

With no prerequisites RJ-TimeLogger can run on any Windows system, eg: it can be stored on a shared network drive and then run from any PC / server your logged into. Creates a simple ‘audit’ or ‘Time Log’ CSV with a choice of 2 date formats out of the box. Optionally runs in a loop for task recording.

Date formats, CSV format etc can all be easily modified to suit your requirements. This script can be used as is, or as snippet for a script your building.

Simply create the files, and copy the code.

RJ-TimeLogger.bat

@echo off
REM RJ-TimeLogger - Rob Jervis 09/02/2014 - http://jervis.ws/rj-timelogger

:start
set /P details=Enter Details: %=%
set rjdate=%date:~-4,4%-%date:~-7,2%-%date:~-10,2%
set rjtime=%time:~-11,2%-%time:~-8,2%-%time:~-5,2%
echo %rjdate%,%rjtime%,%date%,%time%,%details% >> RJ-TimeLogger.csv
cls
goto start

RJ-TimeLogger.csv

2014-02-09,20-02-06,09/02/2014,20:02:06.57,Start of Project 36 
2014-02-09,20-24-12,09/02/2014,20:24:12.92,End of Project 36 
2014-02-09,20-24-31,09/02/2014,20:24:31.27,Start work on emails 
2014-02-09,20-25-41,09/02/2014,20:25:41.85,emails done! Yay. 
Facebooktwittergoogle_plusredditpinterestlinkedinmail

Build a Lync 2013 Lab: Part 3 – Backend Lync SQL Servers

Microsoft Lync 2013

Lync SQL requirements for HA

Lync uses SQL everywhere, there are local databases on each FE & edge server, in addition to the backend Lync SQL databases, monitoring databases, archiving database and persistent chat.

This article covers the deployment of the FE pool’s backend database servers, in a single pool deployment of Lync 2013 this is the main database role. Lync 2013 does not support SQL Clustering, therefore if you want to want to achieve High Availability, you will need to deploy a SQL mirror with an optional witness server.

Separate SQL servers are recommended for larger deployments for monitoring, persistent chat and also archiving roles (archiving when using SQL rather than Exchange 2013 integrated). In this lab, I will show some of these roles consolidated on to the same SQL environment.

Microsoft SQL 2008 R2 and Microsoft SQL 2012 are supported.

SQL Prerequisites

If your running Server 2012, (or following my lab series), then while you still have the Windows install media mounted (or connect/insert it again), install the required windows features:

Add-WindowsFeature NET-Framework-Features -source d:\source\sxs\

At this stage you should disable the firewall if you intend to do so (as its a lab). I prefer to configure the required rules and leave it on, its usually preferable as it helps maintain system security. (Detailed info here)

Installing SQL onto the servers

You will need to connect/insert the SQL Server ISO/media to the server, then allow autorun or run setup.exe from the root folder.

Select ‘Installation’ > ‘New SQL Server stand-alone installation’

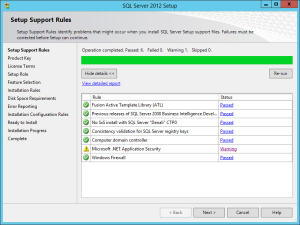
Navigate through the first few steps, allowing the installer to check your system (setup support rules should pass) and select the appropriate license settings.

My system generated a warning due to the test lab not having internet access.

SQL Server 2012 - Setup Support Rules

Now select “SQL Server Feature Installation”

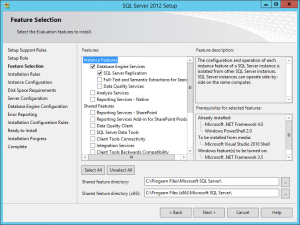
You need to select:

  • “Database Engine Services” required in all instances (eg: Pool backend, Monitoring, Archiving (SQL Mode), Persistent Chat backend
  • “SQL Server Replication” if mirroring, this is required on both servers. eg: Lab LYNCSQL01 and LYNCSQL02
  • “Reporting Services” needed if this server will support the Lync monitoring role
  • “Management Tools” I would recommended for all SQL servers for maintenance and troubleshooting

The only required role for the pool backend is “Database Engine Services”, however all 4 are required in my lab to allow all roles to be deployed.

SQL Server 2012 - Setup Feature Selection

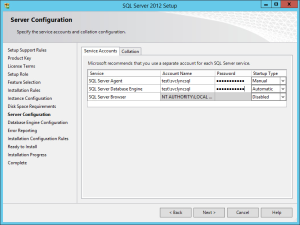
The default instance configuration is usually acceptable, then confirm disk space requirements and review the server configuration. SQL services should be set to use a domain based service account, therefore define that now and create it in Active Directory.

SQL Server 2012 - Setup Service Accounts

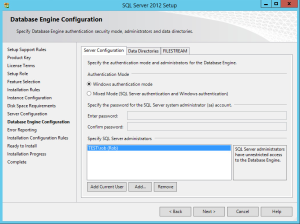
On the Database Engine Configuration page, Add the SQL administrators and also set the data directories as required.

You may choose to split out the Database, Logs and Backup/Maintenance volumes in production to optimize performance and improve disk IO, but for the lab these will reside on C:.

SQL Server 2012 - Setup SQL Authentication

Providing all the configuration rules pass, complete the install and then your done.

If your building the lab from this series, then you will need to complete this process on LYNCSQL01 and LYNCSQL02.

Backup, maintenance and monitoring

While out of scope of this post, I will cover these aspects in a later post.

References & Further Reading

TechNet: Configure SQL Server for Lync Server 2013
TechNet: Install SQL Server 2012
TechNet: Server Collocation in an Enterprise Edition Front End Pool Deployment
TechNet: Configure the Windows Firewall to Allow SQL Server Access

Next time…

In the next post, I will move on to building a High Availability Lync File Store with DFS.

Facebooktwittergoogle_plusredditpinterestlinkedinmail

Build a Lync 2013 Lab: Part 2 – Office Web Apps 2013 Farm (WAC)

Office Web Apps 2013 Logo

Introducing Office Web Apps

Microsoft Office Web Apps 2013 allows you to “access and share Office documents with browser-based versions of Word, PowerPoint, Excel, and OneNote” (Ref: microsoft.com). It enhances the Lync collaboration experience for all parties when sharing documents during conferences. You can deploy an Office Web Apps Server or farm (group of servers) to integrate with SharePoint 2013, Exchange 2013 and Lync 2013.

Office Web Apps Server used be called Web Application Companion (WAC) and is still commonly referred to in this way. This could well just be the time it takes people to adjust, however ‘WAC’ is much quicker to say than ‘Office Web Apps’ and using OWA would cause confusion in some environments hence servers in this post are named WAC.

Below we will be deploying a enterprise farm for initial use by Lync 2013, the farm could later support Exchange 2013 or SharePoint 2013 should they be installed, farm options may need setting at this time via PowerShell.

Install prerequisite software

There are a number of packages required on the system before the installer is run, these are listed in the below PowerShell command and support the web stack on the server. When logged into the Windows Server 2012 R2 server, ensure the media is still mounted and open a PowerShell prompt (run as administrator), then use the elow PowerShell and repeat on all future WAC farm servers. (You can also install Office Web Apps on a Windows 2008 R2 server, the prerequisite information for 2008 R2 is available on TechNet.)

Office Web Apps 2013 prerequisite software

Add-WindowsFeature Web-Server,Web-Mgmt-Tools,Web-Mgmt-Console,Web-WebServer,Web-Common-Http,Web-Default-Doc,Web-Static-Content,Web-Performance,Web-Stat-Compression,Web-Dyn-Compression,Web-Security,Web-Filtering,Web-Windows-Auth,Web-App-Dev,Web-Net-Ext45,Web-Asp-Net45,Web-ISAPI-Ext,Web-ISAPI-Filter,Web-Includes,InkandHandwritingServices,NET-Framework-Features,NET-Framework-Core -source d:\sources\sxs -Restart

You may need to define the install sources location, in my case it was “-source d:\sources\sxs” so this is included above. Once complete, the server will reboot automatically (thanks to the -Restart).

Generating & installing the SSL Certificate

In order to secure communications between the client and Office Web Apps, you will need to secure the communication with an SSL certificate.

In a single server deployment, the SSL certificate should be installed on that host.

In a farm topology the SSL certificate can be installed in one of two places.

      If you have a load balancer with a hardware SSL module, you could use SSL offloading. In this case the certificate must be imported on the hardware load balancer.
      Allow the servers to complete all of the SSL work, and pass the traffic through from the load balancer. Here the certificate will be installed on each server in the Office Web Apps Server farm.

Within this lab, a farm will be deployed with load balancing and no SSL offload.

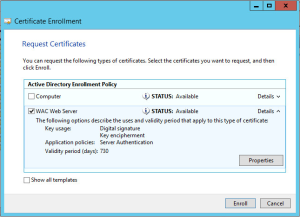
First of all you will need to generate a certificate request, you need to ensure you define a friendly name so this can be quoted when you install the Office Web Apps farm. I will not cover the full process here, but have included some key information. I setup the lab PKI to allow me to enroll the certificate via Active Directory and then restricted this with the security configuration.

Key Certificate Options

  • Use = Server Authentication
  • Common Name = wac.test.com
  • Friendly Name = WAC Farm 2014
  • Key Size = 2048 (Recommended minimum at time of writing)
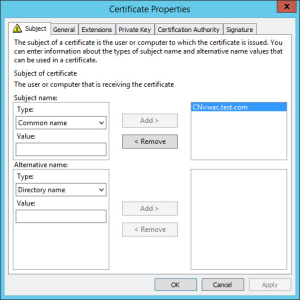
Office Web Apps 2013 Certificate Request

Office Web Apps 2013 Certificate Request 2

You must install your newly obtained wac.test.com certificate (including the private key) into the Local Computer, Personal Certificates store on both servers.

You can open the certificate store via: Run > ‘mmc’ > File > Add/Remove Snap-in… > Certificates > Add > Computer Account
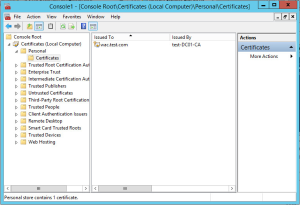
Office Web Apps 2013 Certificate Installed

Installing Office Web Apps 2013

Once you have downloaded the Office Web Apps 2013 installer, and the Office Web Apps 2013 Update as per my last post, you need to either mount the installer .img file to the virtual CD drive as you would an .iso, or Windows Server 2012 can open the .img file directly. Run the Setup.exe in the root of the disk.

You will need to accept the terms of this agreement, choose an install file location and select Install Now.
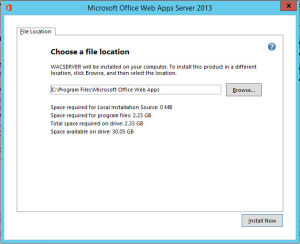
Office Web Apps 2013 Installer

When setup finishes installing Office Web Apps Server, choose Close. The servers firewall must be configured to allow access to the WAC service hosted on TCP/443. This server is now ready to be updated and configured.

Updating Office Web Apps Server 2013

Copy the update file to both servers in the Office Web Apps farm, and then install the update. At this stage, the farm is not deployed and is not in service, so take the chance to install all of the latest updates and reboot both servers.
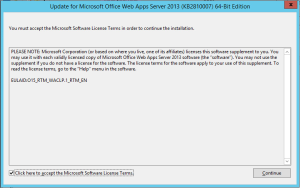
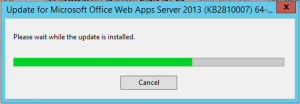
Office Web Apps 2013 - Update

Office Web Apps 2013 - Update2

Deploy the farm

There are several options when deploying the farm:

  • Deploy a single-server Office Web Apps Server farm that uses HTTP
  • Deploy a single-server Office Web Apps Server farm that uses HTTPS
  • Deploy a multi-server, load-balanced Office Web Apps Server farm that uses HTTPS

As discussed already, I will be using option three (full details of all options here). This provides us with protection from a server failure, and protects our users and data with SSL as all pages will be hosted securely. As we do not have a hardware SSL module in our load balancer, we will configure the servers to terminate the SSL.

On the first server, create the WAC farm:

New-OfficeWebAppsFarm -InternalUrl "https://wac.test.com" -ExternalUrl "https://wac.test.com" -CertificateName "WAC Farm 2013"
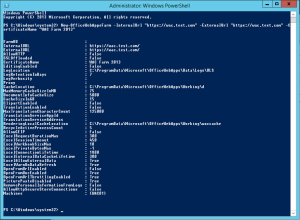
Office Web Apps 2013 - NewFarm

This shows the example results:

PS C:\Windows\system> New-OfficeWebAppsFarm -InternalUrl "https://wac.test.com" -ExternalUrl "https://wac.test.com" -CertificateName "WAC Farm 2013"

FarmOU                            :
InternalURL                       : https://wac.test.com/
ExternalURL                       : https://wac.test.com/
AllowHTTP                         : False
SSLOffloaded                      : False
CertificateName                   : WAC Farm 2013
EditingEnabled                    : False
LogLocation                       : C:\ProgramData\Microsoft\OfficeWebApps\Data\Logs\ULS
LogRetentionInDays                : 7
LogVerbosity                      :
Proxy                             :
CacheLocation                     : C:\ProgramData\Microsoft\OfficeWebApps\Working\d
MaxMemoryCacheSizeInMB            : 75
DocumentInfoCacheSize             : 5000
CacheSizeInGB                     : 15
ClipartEnabled                    : False
TranslationEnabled                : False
MaxTranslationCharacterCount      : 125000
TranslationServiceAppId           :
TranslationServiceAddress         :
RenderingLocalCacheLocation       : C:\ProgramData\Microsoft\OfficeWebApps\Working\waccache
RecycleActiveProcessCount         : 5
AllowCEIP                         : False
ExcelRequestDurationMax           : 300
ExcelSessionTimeout               : 450
ExcelWorkbookSizeMax              : 10
ExcelPrivateBytesMax              : -1
ExcelConnectionLifetime           : 1800
ExcelExternalDataCacheLifetime    : 300
ExcelAllowExternalData            : True
ExcelWarnOnDataRefresh            : True
OpenFromUrlEnabled                : False
OpenFromUncEnabled                : True
OpenFromUrlThrottlingEnabled      : True
PicturePasteDisabled              : True
RemovePersonalInformationFromLogs : False
AllowHttpSecureStoreConnections   : False
Machines                          : {WAC01}
PS C:\Windows\system32>

If you using SSL Offload, you will need to adjust this command accordingly:

New-OfficeWebAppsFarm -InternalUrl "https://wac.test.com" -ExternalUrl "https://wac.test.com" -SSLOffloaded

If your deploying Office Web Apps server to use with other products such as Exchange 2013 or SharePoint 2013, there maybe further considerations including use of the -EditingEnabled option, licensing and farm size to consider here.

On the second (and any further) server(s), join the existing farm via its master server.

New-OfficeWebAppsMachine –MachineToJoin "wac01.test.com"

Office Web Apps 2013 - NewMachine

You can check the farm configuration by using:

Get-OfficeWebAppsFarm

Configuring the load balancer

To complete the farm, we need to balance requests across the member servers. This can be achieved using the load balancer we deployed earlier in the lab.

First define the ‘virtual’ service and its ‘virtual’ IP (VIP). Following the installation of the loadbalancer.org server within the lab, we can reconfigure the initial virtual service.

Set the following parameters:

Name = WAC
Virtual Service IP address = 192.168.0.110
Virtual Service Ports = 443
Persistent = Yes
Email Alert Destination Address = (as required)
Negotiate Check Options - Protocol = HTTPS

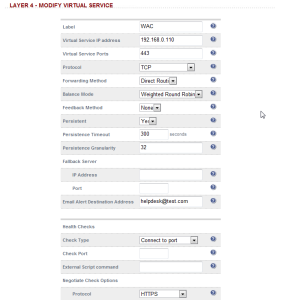
Load Balancer - Default Virtual Service

Load Balancer - WAC Virtual Service

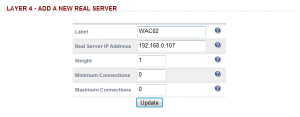
Now add all the ‘real’ servers into the virtual service. In this case, add WAC 02 into the configuration:

Label = WAC02
Real Server IP address = 192.168.0.107

Also revise the name of the first server from Real_Server_1 to WAC01.

Load Balancer - WAC Real Servers

Load Balancer - WAC Add Real Server

Load Balancer - WAC Real Server Configuration

Review the configuration and status of the new virtual service. If the service is down, double check the firewall configuration on the servers and complete some connectivity tests.

Load Balancer - WAC Overview

Please note that the ARP problem must be solved on each real server. Please see the DR Mode Considerations section in Chapter 6 of the Administration Manual for guidance.

** Details to follow **

Setup load balanced DNS name

On your lab DC, or within your internal DNS service, you need to define the wac.test.com DNS A record.
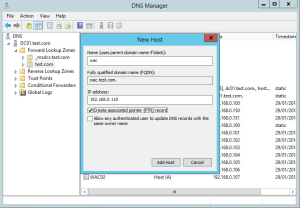
Configure WAC DNS Name

Testing the farm

In order to ensure the farm is working as expected, you should test each server:

https://wac01.test.com/hosting/discovery
https://wac02.test.com/hosting/discovery

You will see an SSL error for each server, this is acceptable providing the certificate you receive from the server is for wac.test.com because users will not hit the server addresses directly in this way. If you do not get the correct ‘shared’ certificate, revisit the earlier steps in this post and double check your farm configuration.
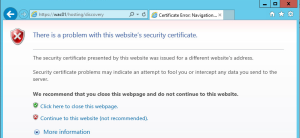
Office Web Apps 2013 - Test SSL Error

Office Web Apps 2013 - Test WAC01

Lastly we need to test the load balanced address to ensure the same result. You should test the following address several times changing the load balancer to ensure both nodes reply correctly.

https://wac.test.com/hosting/discovery

Load Balancer - WAC Service Testing

You can also check access on both servers via the IIS Logs (located in C:\inetpub\logs\LogFiles):

#Software: Microsoft Internet Information Services 8.5
#Version: 1.0
#Date: 2014-02-01 22:05:24
#Fields: date time s-ip cs-method cs-uri-stem cs-uri-query s-port cs-username c-ip cs(User-Agent) cs(Referer) sc-status sc-substatus sc-win32-status time-taken
2014-02-01 22:05:24 192.168.0.106 GET /hosting/discovery - 443 - 192.168.0.107 Mozilla/5.0+(Windows+NT+6.3;+WOW64;+Trident/7.0;+rv:11.0)+like+Gecko - 200 0 0 843

More Security Settings

Beyond end-to-end SSL/HTTPS there are a couple of more security options you may wish to consider, these are as follows:

Restricting which servers can join an Office Web Apps Server farm
You can prevent unauthorized servers from joining an Office Web Apps Server farm by creating an organizational unit (OU) for those servers and specifying the FarmOU parameter when you create the farm.

New-OfficeWebAppsFarm -InternalUrl "https://wac.test.com" -ExternalUrl "https://wac.test.com" -CertificateName "WAC Farm 2013" -FarmOU "OU=WAC Farm,OU=Member Servers,DC=test,DC=com"

Limiting client access to Office Web Apps Server via an Allow List
The Allow List security feature prevents unwanted clients connecting to an Office Web Apps Server farm. This allows control over file operation requests, such as file retrieval, metadata retrieval, and file changes.

References & Further Reading

TechNet: Deploy the infrastructure – Office Web Apps Server
TechNet: Windows PowerShell for Office Web Apps Server
How to license Office Web Apps Server

Next time…

In the next post, I will move on to deploying the back end Lync SQL Servers, which are required to support the Lync 2013 enterprise pool.

Facebooktwittergoogle_plusredditpinterestlinkedinmail